

Best Hydration Bladders
 Don't forget to follow us on Instagram for the latest gear news!
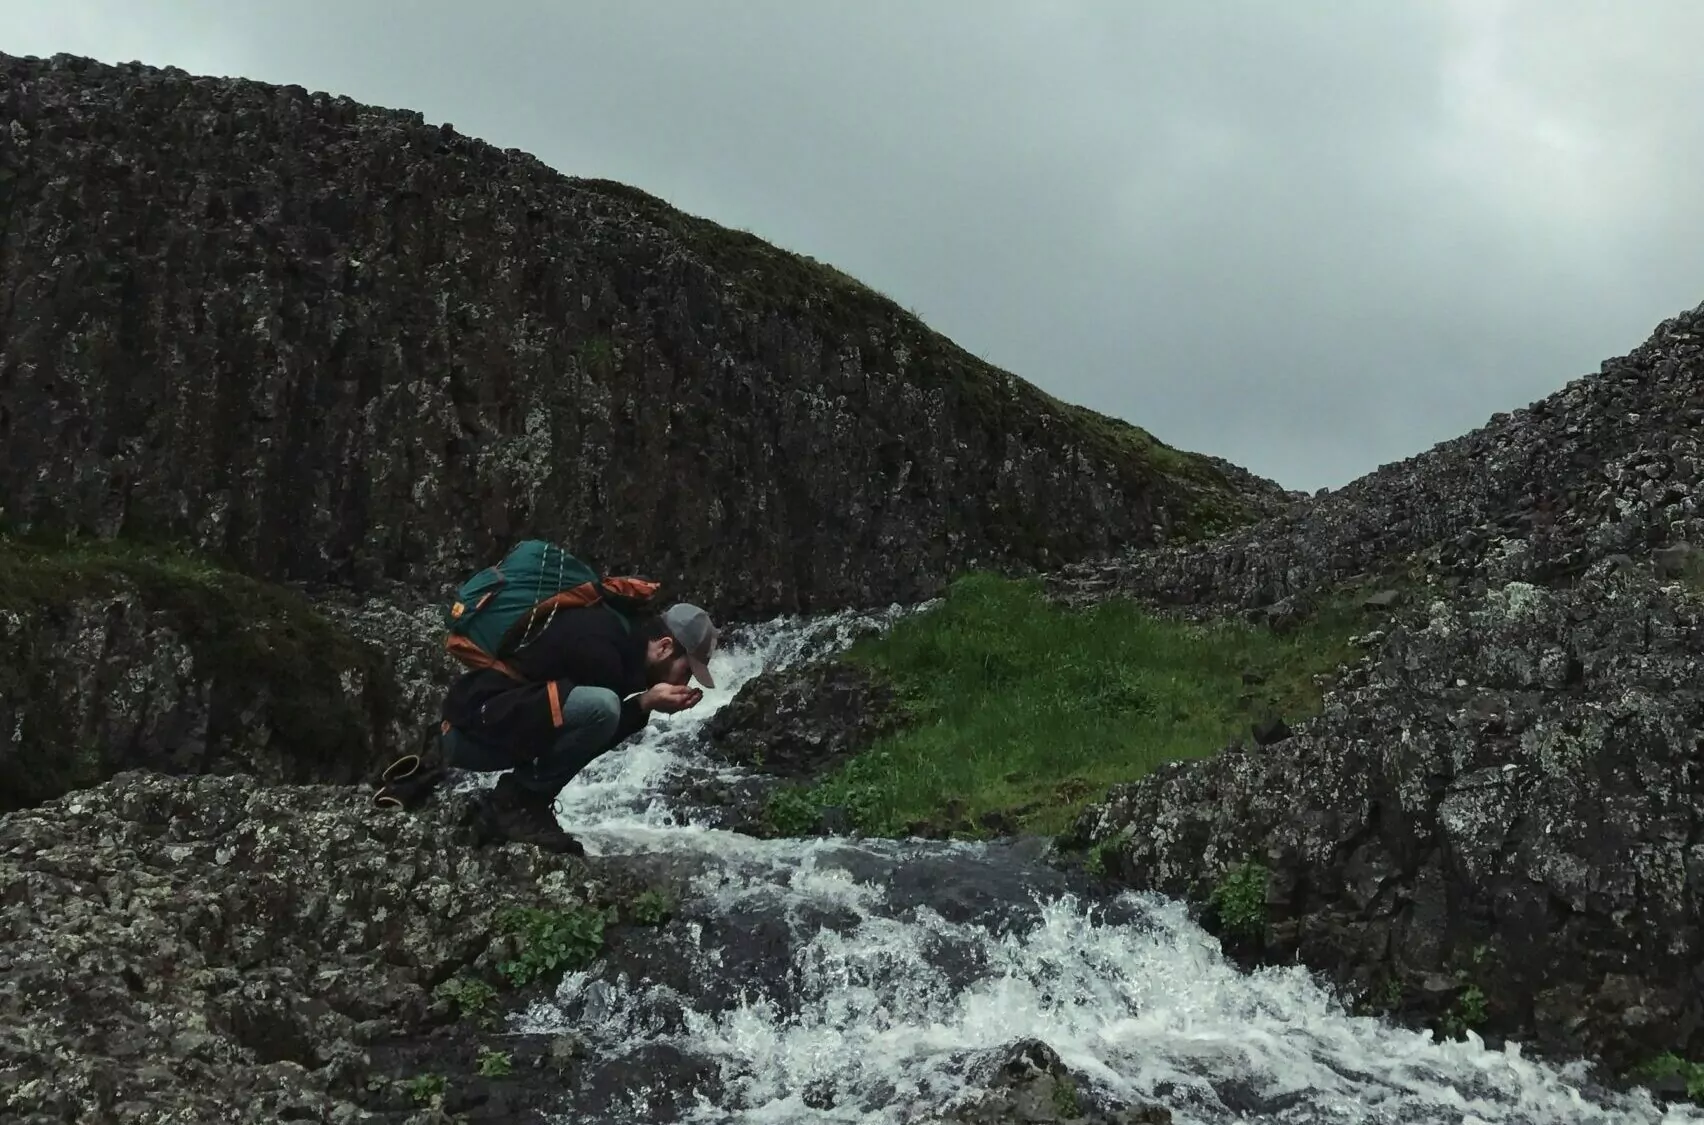
Hydration is one of the foundational stones on which all outdoor adventures are built. Proper hydration on the trail is absolutely crucial to enjoying your adventure and feeling strong and healthy to hit the trail each morning, no matter if it’s a hot day on a Grand Canyon hiking tour or a blustery day while climbing Mount Washington. To make achieving that goal easier while racking up those miles, we have hydration bladders. But good grief, there are just so many options out there – not to worry. We’ve sifted through the options and uncovered the best hydration bladders for hiking currently on the market. So read on and get hydrating!
QUICK LIST OF RECOMMENDATIONS
- Best Hydration Bladder Overall – Platypus Big Zip Evo – 3-Liter / 2-Liter
- Best Feature-Rich Hydration Reservoir –Gregory 3D Hydro – 3-Liter / 2-Liter
- Best Streamlined Hydration Badder – CamelBak Crux – 3-Liter / 2-Liter
- Best Insulated Hydration Bladder (And Durable!) –Hydrapak Hydrasleeve – 3-Liter
- Best Hydration Bladder for Group Camping – MSR DromLite – 2, 4, 6-Liter Versions
Honorable Mentions
KEY CONSIDERATIONS for the best Hydration Bladders
What is a Hydration Bladder?
A hydration bladder is, in essence, a soft plastic bag/sac – often made from polyethylene or polyurethane – that is specially designed to hold water. The bladder attaches to specific mount points in the interior of your hiking backpack on the side that sits against your back. A small diameter plastic tube then connects to this bladder and snakes it’s way through a special port on the hiking bag and connects to the pack’s shoulder strap. The end of this tube has a bite valve, which you place in your mouth and gently bite to open the valve, and then the tube essentially turns into a very long straw – giving you easy access to your water supply.
Do You Need A Hydration Bladder? What About Water Bottles?
A hydration bladder offers a lot of advantages to most hikers. Most importantly, they allow you to easily sip water throughout the day without needing to stop and reach for a water bottle. Bladders also sit closer to your mid back, which is the ideal spot to place heavier loads for backpacking trips, giving them an ergonomic advantage over water bottles. However, the downsides are that hydration bladders can be trickier to clean, have more mechanisms that could break, and are less durable (which can lead to leaks).
On the other side of the equation, we have your traditional water bottles – we’ll use the classic Nalgene bottles as an example. These water bottles are significantly more robust than bladders and can take a lot more abuse without breaking. Additionally, they’re very straightforward to clean and don’t rely on any extra parts that could break (such as valves or hoses). But for their robust simplicity, water bottles are also less convenient than bladders since you need to stop and take a few moments to reach your bottle for a drink (or ask a buddy to reach it for you). This inconvenience is a big downside for water bottles and also makes it much harder to follow the general hydration guideline that it’s better to sip often than to drink a lot of water all at once.
So, what’s the best choice for you? Well, that question will boil down to your personal preferences for hiking hydration. For our part at Wildland Trekking, if you decide to bring a water bladder, we always recommend that you also bring along at least one water bottle just in case the bladder gets punctured or breaks during the trip.
Hydration Bladder Capacity
Most hydration bladders range from 1.5 to 3.0 liter capacity. The vast majority of hikers will find 2-3 liters to be the best option. Not too heavy with extra water that you may not need, but still carrying enough water to (in most conditions) see you through a solid day of hiking. That said, of course think about your particular needs. Do you tend to go through more water during the day? This may be especially important if you also carry water for small children. Or, do you tend to opt for shorter day hikes? In which case, you may not need as much water.
Closure Mechanism
We often see two main mechanisms to get into your hydration bladder and fill it up (or clean it). These are a twist-cap or a slide-seal.
The twist cap functions just as you’d expect, a large cap that locks into place when you twist it. These caps are often positioned on the front of the bladder (not at the top like a water bottle) and tend to have a rigid plastic neck and handle that make it easy to hold the open cap under your water source. The downside to twist cap bladders is that they tend to be harder to clean since the opening is often too small to get a hand through. There are brushes and scrubbers that work for this, but it’s a downside when you can’t just stick your hand in there and easily clean it. Lastly, twist-cap bladders tend to be harder to empty all the water out of and dry after your trip since the cap isn’t at the very top of the bladder.
Slider top bladders allow the entire top portion of the bladder to open completely. When it’s time to seal it up, the plastic folds over, and a rigid plastic slider/lock slides across the top portion of the bladder and seals it. This type of bladder closure can be convenient because it’s very easy to get your whole hand and arm into the bladder for easy cleaning. These bladders can also dump all their water easily and hang on a rack or sit upside down for quick drying (some even turn inside out). However, the downside here is that these bladders are a little more finicky to fill since you have to manually hold the top open – making the filling process a two-handed operation in most cases.
Durability
Hydration bladders’ durability often becomes their Achilles heel in the eyes of many hikers. The bladder itself can get punctured and then leak, or the valve or hose mechanism can break. But thankfully, manufacturers are getting better and better at improving bladder materials to help prevent punctures and making other critical components (like the bite valve) easily replaceable.
That said, the vast majority of bladder punctures and subsequent leaks can be traced back to user error – such as keeping sharp objects too close to the bladder in your pack or flopping down on your pack after a long hike and forgetting you have a full water bladder in there. Therefore, with proper use, care, and cleaning, the best hydration bladders should be able to last for many seasons in the backcountry.
Is also worth noting that there are hydration bladder patch kits that may be worth adding to your supplies so that you can fix a leak in the field should the need arise.
Common Features
Let’s take a look at a few common features that are worth being on the lookout for as you search for the best hydration bladder for your next adventure.
Rigid backing is sometimes included on the front surface of hydration bladders in order to provide some structure and prevent them from collapsing down on themselves as the water level drops. This backing also makes it easier to load the bladder in your bag and protects that particular side from punctures. However, be aware that rigid backing also adds a little more bulk and weight to your hydration bladder.
Internal baffles are internal dividers inside the bladder itself that connect the walls to each other and, in so doing, allow the bladder to hold its shape. This feature is much more lightweight than the rigid backing feature that we just discussed, but it slightly complicates cleaning since you now have to navigate around those dividers in order to adequately clean the bladder.
Bite Valve On/Off Switch is a manual switch/valve that allows you to completely turn off the bite valve when you’re not using it. This can be a very handy feature to prevent unintentional leaks from your bite valve. These leaks are surprisingly common, and can occur when you accidentally sit on the bite valve, or it gets stuck between your back and backpack, or simply when it’s getting old and may not seal all the way. For all these reasons, we’re very fond of hydration bladders that have a manual on/off switch for the bite valve.
A Hose Quick Disconnect is a handy push-button connector for the hose near the base or top of the hydration bladder. This feature is very useful for removing the bladder from your backpack for refilling without having to snake the entire hose back through the backpack. Instead, you can just disconnect the bladder from the hose in a second, and it’s ready to go.
Price
Luckily, hydration reservoirs aren’t spectacularly expensive and tend to fall between $25 and $60. The most high-end options will include many of the features we discussed above. Meanwhile, budget-focused options will save you some money but oftentimes lack these more handy features – such as an on/off switch on the bite valve and a quick connect port for the hose.
Therefore, consider your personal budget and how often you plan to use your new hydration bladder. If it’s for that one big trip of the summer, then perhaps a budget option will be the most suitable. This also applies if you’re very unsure about using a hydration bladder at all and just want to test the waters for now. Conversely, if you know you’ll be hitting the trail often and want a hydration system with all the bells and whistles, then paying a little extra may certainly be worth it.
Platypus Big Zip Evo
Best Water Bladder Overall
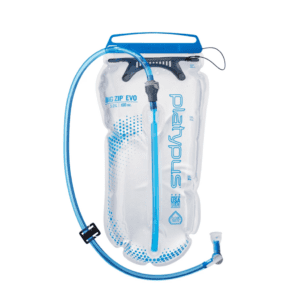 MSRP: $59.95 (3L) – $49.95 (1.5L)
- CAPACITY: 3 Liters
- CLOSURE: Slider
- WEIGHT: 6.5 oz. (3L) – 5.6 oz. (1.5L)
PROS: Durable material – Bite valve shutoff switch – Hose quick disconnect at top of bladder
CONS: Expensive – Stiffer material makes it feel clunky
LOOKING CLOSER: When it comes to hiking hydration bladders, we at Wildland tend to prioritize durability, reliability, and ease of use when we look for the best options, and the Big Zip Evo from Platypus checks all three of these boxes. The polyethylene material is noticeably more rigid than other options and feels tougher and more burly than softer materials on the market. Additionally, the high flow rate through the hose and easy-to-fill slider design make this bladder very user-friendly. The quick disconnect port for the hose is also conveniently placed high up at the top of the bladder, so you don’t have to rummage down to the bottom in order to disconnect and remove the bladder for refills. But the burly design does mean the Big Zip Evo is slightly heavier than other options on the market, and it’s also on the more expensive side. But the durable and reliable performance of the Big Zip Evo easily makes this one of the best hydration bladders for hiking on the market.
View At PlaTypus
3 Liter Version2 Liter Version
View At REI.COm
Gregory 3D Hydro
Best Feature-Rich Hydration Bladder
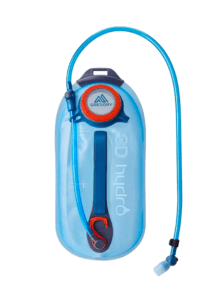 MSRP: $44.95 (3L) – $42.95 (2L)
- CAPACITY: 3 Liters – 2 Liters
- CLOSURE: Twist Cap
- WEIGHT: 7.0 oz. (3L) – 6.5 oz. (2L)
PROS: Full-length Handle – Hose quick disconnect – Drying hanger – Magnet on bite valve
CONS: Heavy/Bulky
LOOKING CLOSER: Gregory put a lot of thought into their 3D Hydro Bladder, and it shows. This hydration bladder contains so many useful features that it’s hard to list them all! First, the extra long (almost full-length) handle adds nice structure to the bladder and makes filling and carrying it around incredibly convenient. There’s also a handy hanger at the bottom of the bladder to hang it upside down to dry after cleaning, allowing it to drain and dry very quickly. The hose quick disconnect port is well placed at the top of the pack, while the bite valve has a built-in magnet to easily secure to your pack’s shoulder strap, along with an on/off switch for the valve. Whew, that was a lot of features! All these features work together fantastically, giving the 3D Hydro absolutely stellar performance in the field. However, all these features add weight, also making the 3D Hydro among the heaviest options on our list at 7.0 ounces. So for folks who want all the bells and whistles for excellent performance and convenience in the backcountry, this is one of the best hiking hydration bladders for you. But if all these features sound like overkill and you’d prefer a more compact and lightweight design, then perhaps this one isn’t for you.
View on REI.com
3 Liter Version2 Liter Version
View on Backcountry.com
CamelBak Crux
Best Streamlined Hydration Bladder
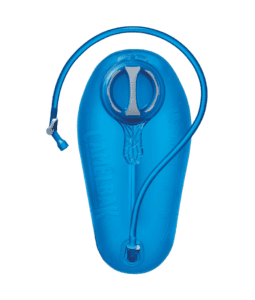 MSRP: $39.00 (3L) – $37.00 (2L)
- CAPACITY: 3 Liters – 2 Liters
- CLOSURE: Twist Cap
- WEIGHT: 8.0 oz. (3L) – 7.0 oz. (2L)
PROS: High Flow Rate – Easy to Use – Proven reliability – Great Price – Streamlined design
CONS: Tricky to clean – Fewer features – Heavier
LOOKING CLOSER: The Crux hydration bladder from Camelbak has a well-established history of reliable performance in the field, and it’s available for a very affordable price as well. The straightforward design forgoes several newer features – like a drying hanger, magnet on the bite valve, and high-placed quick disconnect (theirs is at the bottom of the bladder) – in favor of a much more minimalistic and streamlined design. This no-frills approach is ideal for folks who don’t want to spend extra money on features they don’t need. To that point, the Crux is very competitively priced and certainly a solid choice for backcountry hiking. Just be aware that the Crux hydration bladder is also notably heavy (thanks to its thick material and bulky handle/cap combo).
View on REI.com
3 Liter Version2 Liter Version
View on Backcountry.com
Hydrapak Hydrasleeve
Best Insulated Hydration Bladder
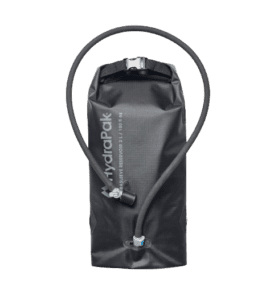
- MSRP: $68.00
- CAPACITY: 3 Liters
- CLOSURE: Slider
- WEIGHT: 10.8 oz.
PROS: Insulated bladder and tube keep water cool in summer and unfrozen in winter – Very durable ripstop nylon cover
CONS: Very expensive – Heavy
LOOKING CLOSER: Hiking in subfreezing temperatures brings the risk of your hydration bladder freezing up (especially the hose). That’s where the Hydrapak Hydrasleeve comes in. The insulated bladder body and hose do an excellent job keeping the water unfrozen when the temperatures drop – and also work to keep water cool and refreshing in intense summer heat. Moreover, the insulation sleeve uses burly ripstop nylon, adding another layer of hardy protection for the water bladder. All this insulation and durable fabric make the Hydrasleeve one of the heaviest water bladder options out there, but it may be worth it for hikers heading into extreme temperatures!
Redesigned for this year, the latest HydraSleeve includes four lash points for easy storage on any type of pack or rig, along with some minor material updates.
View on REI.com
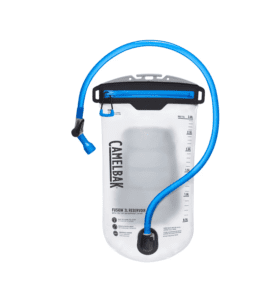
MSR Dromlite
Best Hydration Bladder for Group Camping
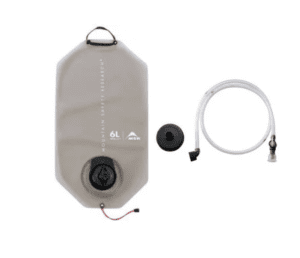 MSRP: $40.95 (4L) – $46.95 (6L)
- CAPACITY: 2, 4, and 6 Liter Version
- CLOSURE: Twist Cap
- WEIGHT: 5.1 oz. (4L) – 5.7 oz. (6L)
PROS: High water capacity – Lightweight – 3-in-1 cap for easy filling, pouring, and drinking – Durable
CONS: Hose and bite valve not included – Minimal structure (tricky to pack when full)
LOOKING CLOSER: The MSR DromLite bag is an ideal water system for multiple hikers. With 4-liter and 6-liter options, there’s plenty of water to go around with this option. At camp, simply hang the bag by the included attachment loop and use the specialized 3-in-1 cap for easy pouring/dispensing and filling water bottles. When hiking, swap out the cap for MSR’s hydration system to turn the DromLite bag into a traditional hydration bladder. With this functionality, you can carry plenty of water for you and the kids or other hikers you’re nice enough to share with. However, the DromLite bag lacks any internal baffles or exterior structure, meaning that it grows to a cumbersome shape when full of water and becomes nearly impossible to slide into a traditional water bladder sleeve that most hiking packs have. Therefore, the DromLite often just sits on top of your other gear in your pack, which makes for awkward weight distribution while hiking. It’s also too bad that the hydration hose isn’t included with the DromLite purchase. But despite these drawbacks, the DromLite is an excellent hydration bladder/system for families or hikers who are responsible for more than just their own personal water consumption in the backcountry.
View on Backcountry.com
View AT MSR
Honorable Mentions

Best Hydration Bladders for Hiking
Osprey Hydraulics
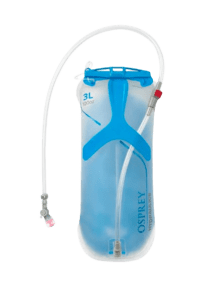 MSRP: $50.00 (3L) – $48.00 (2L)
- CAPACITY: 3 Liters – 2 Liters
- CLOSURE: Slider
- WEIGHT: 8.3 oz. (3L) – 7.4 oz. (2L)
PROS: Rigid Backing – Good Flow Rate – Easy Cleaning – Lock for Bite Valve
CONS: Heavy (due to rigid backing) – Expensive
LOOKING CLOSER: The Hydraulics bladder from Osprey is a solid all-around performer. It’s easy to use and fill while the TPU film has proven itself as a long-lasting and durable material. The quick disconnect port for the hose and locking switch on the bite valve also add to the bladder’s utility and performance in the backcountry. Finally, the rigid back is a fairly unique feature that adds some structure to the bladder while also making it easier to slide into the reservoir sleeve in our backpack without worrying we’re going to snag the bladder on something. However, this bulkier back also noticeably increases this bladder’s overall weight But, all in all, it’s an excellent choice that won’t let you down during your hike – but be aware that the Hydraulics bladder is priced slightly higher than similar options.
View on REI.com
Camelbak Fusion
 MSRP: $57.00 (3L) – $55.00 (2L)
- CAPACITY: 3 Liters – 2 Liters
- CLOSURE: Zipper
- WEIGHT: 5.5 oz. (3L) – 5.0 oz. (2L)
PROS: Unique zipper design – Lightweight – Good Quality – Rigid backing – High-quality features
CONS: Zipper design is new to the industry and untried for the long-term – Expensive
LOOKING CLOSER: Camelbak has thrown an entirely new concept into the world of hydration bladders with the zipper design on the Fusion. The zipper is 100% waterproof and is designed to provide a very easy and more convenient opening than the classic slider or twist cap. Early trials are promising for this zipper design, and it sure is convenient! However, time will tell if this new design can hold up long term to the trials of hiking. The zipper aside, the Fusion also includes several high-end features that we like to see on hydration bladders, along with rigid backpacking to help it maintain its shape (and we’re pleasantly surprised that Camelbak was able to keep the overall weight low in spite of this backing material).
View on REI.com
3 Liter Version2 Liter Version
View on Backcountry.com
Award Winning Trekking Adventures
Since 2005, Wildland Trekking has been providing all-inclusive, guided hiking and backpacking trips across the USA and the world. Explore your world with the hiking experts!

More Information About Hydration Bladders
Hydration Bladder Maintenance
It’s shockingly easy to forget about cleaning your hydration bladder. After all, you’re only putting clean water in there – so why should you need to clean it? Well, if there’s one lesson that hiking rudely teaches most people, it’s that any piece of gear that gets wet needs to be cleaned – and that includes your hydration bladder.
Bacteria and mildew love moisture and can grow in the most inconvenient places. As far as hydration bladders are concerned, those places are often the hose and nooks within the bladder that are difficult to drain completely. What’s more, mineral deposits and grime can slowly build up over time and gum up your quick disconnect ports and bite valve. Therefore, try to make it a habit to clean your hydration bladder occasionally during the season and definitely before you put it into storage for any prolonged length of time.
Each manufacturer has their own instructions on how to clean their products. But in general, you’ll want to wash the bladder and hose with warm, soapy water in addition to rinsing out the entire system with one of the following: a baking soda solution, a specific reservoir cleaning tablet, or a lemon juice and water mixture (to help neutralize odors). Cleaning kits and hose-specific brushes are also available to make sure you reach every nook and cranny of your hydration bladder. Again, your hydration bladder’s manufacturer will have specific instructions on how to clean their product.
Once clean, make sure the entire system is completely drained and 100% dry before storing!
Why Trust Us?
Choosing the right outdoor gear and apparel can be difficult. But at Wildland Trekking, we live and work with hiking gear every single day. It’s an integral part of what we do, and we understand better than anyone how important it is to have the right equipment. In addition to our vast knowledge of backpacking gear, we also offer:
- Independence – our recommendations are not influenced by partnerships or sponsorships with outdoor gear and apparel manufacturers.
- Experience – as one of America’s top guide companies, we take 8,000-10,000 people on hiking and backpacking tours annually. Since our inception in 2005, we have guided more than 75,000 people into the wilderness.
- Cutting Edge Knowledge – we regularly attend trade shows and pay close attention to the leading edge of new developments.
- Up To Date Recommendations – we update our recommendations regularly as new products are developed and released.
- Dedication to our Readers – we know that the gear we select as our top picks will end up in the field with our readers, and we take that responsibility very seriously. We view our readers as guests on our guided trips, just without the guides. We are committed to helping you be as well-outfitted and prepared as possible for your adventures.
*Disclosure: Some of the links above are affiliate links. At no cost to you, we earn a commission on any products purchased through these links. Any proceeds go to supporting our blog and operations. These affiliate links do not influence the products that we include in our gear round-ups. We only recommend products that we 100% support and that we have used in the field.
More Gear Recommendations
Check out our Wildland Gear Guide for more recommendations about hiking, trekking, camping and outdoor gear. We are always adding new products to help our guests and readers make the best choices to outfit their adventures.
- Packing List Quick Links for Wildland Guests
- Wildland Packing List Video
- Best Low Top Hiking Shoes
- Best Boots for Backpacking Trips
- Best Rain Jackets
- Best Rain Pants
- Best Long Underwear
- Best Mid Layers
- Best Tents for Backpacking Trips
- Best Tents for Car Camping Trips
- Best Backpacking Backpacks
- Best Daypacks
- Best Trekking Poles
- Best Sleeping Bags
- Best Headlamps for Hiking
- Best Backpacking Sleeping Pads
- Best Backpacking Stoves
- Best Backpacking Water Filters
- Best Hiking Socks
- Best Backpacking Cookware
- Best Hiking Shirts and Tops
- Best Hiking Pants
- Best Camp Shoes
- Best Hiking Shorts
- Best Gaiters
- Best Sun Hats
- Best Sun Hoodies
- Best Duffel Bags
- Best Camp Towels