

Best Backpacking Stoves
Let's review our recommendations for the best backpacking stoves currently on the market and our top buying advice.
A nice warm meal after a long day on the trail is an absolute must for many backpackers – but how do you get it? While rustically cooking over a campfire has aesthetic appeal, it can be labor-intensive, challenging, and sometimes not allowed in many national parks. That’s why it’s time to review the best backpacking stoves on the market! No matter where you are, a reliable stove will always ensure you can get a hot meal or drink when you need it the most. So no matter where you’re heading – be it a fantastic hiking trip in Grand Canyon National Park or an exotic backpacking trip in the Alps – these stoves have you covered.
QUICK LIST OF RECOMMENDATIONS (Jump to Section)
Best Canister Stove Overall– MSR PocketRocket 2
Best Canister Stove for Wind and Cold –Soto Fusion Trek
Best Integrated Backpacking Stove for Quick Boiling – Jetboil Flash
Best Integrated Backpacking Stove for Cooking – Jetboil MiniMo
Best Liquid Fuel Stove –MSR Whisperlite International
Best Wood-Buring Stove – Solo Stove Lite
Honorable Mentions (Jump to Section)
KEY CONSIDERATIONS for the Best Backpacking Stoves
Stove Type
Let’s start this best backpacking stoves roundup by first defining the different types of stoves on the market, so you can appreciate all the avenues that are open to you. In the realm of backpacking stoves, we have fully integrated and non-integrated stoves. While the names may sound technical, the differences between these two are very straightforward.
First, integrated backpacking stoves are designed to have every aspect of the cooking process lock together in a single, streamlined package. This means the fuel (typically a canister of isobutane and/or propane), a heat exchanger, and a pot are all designed to lock together for optimal heating efficiency. These stoves typically offer very short boil times, excellent fuel efficiency, and the convenience of getting your entire cook system in just one purchase. However, integrated backpacking stoves are often geared towards boiling water (hot drinks or dehydrated meals) and not elaborate backcountry cooking. They often lack a simmer capability – with a few exceptions, such as the Jetboil MiniMo – and you can’t swap out the integrated pot for a fry pan. For more involved cooking endeavors, a non-integrated stove is typically your best bet.
As you probably guessed, non-integrated stoves keep the fuel, cooking surface/pot, and the stove itself all separate. The stove is connected to the fuel through various means – depending on the fuel type, which we’ll discuss next – and the cooking surface simply sits on top of the stove and can be a pot, frypan, griddle, or any other stovetop cooking vessel. This setup yields maximum versatility for you campers not beholden to only dehydrated meals and allows you to cook up whatever you want at your campsite. On the other hand, non-integrated backpacking stoves tend to be less fuel-efficient than their integrated cousins and have longer boil times. But the flexibility of cooking any way you want may make these drawbacks worth it, and non-integrated stoves also tend to be the cheapest options on the market.
Fuel Type
There are many different fuel options for your backpacking stoves. The fuels we’ll cover here are canister, liquid, solid, wood, and alcohol fuels.
Canister Fuel
Canister fuel stoves are ubiquitous in the backcountry, and for a good reason – they offer an excellent balance between convenience, stove efficiency, and weight. This fuel (often a mix of propane and isobutane) burns clean and hot and is easy to regulate with most stoves, so you can simmer food if needed. Canisters offer a threaded top onto which your stove screws on – then simply turn on the gas flow, light, and your good to go.
There are a few downsides to canister fuel that we should also discuss. First, the canisters are not refillable and become single-use waste at the end of your trip. Multiple canisters can also become very bulky and difficult to pack for longer trips and may also be challenging to track down abroad in some remote, international destinations. These downsides bring us to our next fuel option, liquid fuel.
Canister Fuel Pros and Cons:
Pros:
- Convenient
- Good for shorter trips (2-3 days or less)
- Easy to use
- Very effective part of integrated stove systems
Cons:
- Longer boil times
- Multiple canisters become bulky for long trips
- Hard to protect from wind
- Single-use containers
Liquid Fuel
Liquid fuel backpacking stoves tend to burn hotter than canister gas, providing improved boil times and performance in adverse conditions. Liquid fuel (often white gas) is stored in a refillable metal bottle and connected to your stove via a specialized fuel line. This fuel/stove setup includes a pump to bring the non-pressurized refillable bottle up to pressure for the burning process to work. White gas is also readily available almost anywhere in the world. The refillable metal bottle also means you cut down on waste. Just purchase the gas in gallon or larger containers to keep at home and refill your metal bottle for each trip.
However, liquid fuel does have its disadvantages. It’s a more involved process to operate these stoves as they include a pump for the fuel and need the stove to be primed to start burning the fuel properly. These stoves also require more regular maintenance and cleaning than their canister fuel counterparts.
Liquid Fuel Pros and Cons:
Pros:
- Readily available domestically and internationally
- Reusable fuel container
- Burns nice and hot
- Easier to shield from wind
Cons:
- More complicated use (pumping and priming the stove)
- Stove often needs more maintenance
Solid Fuel
Solid fuel is one of the most straightforward and easy-to-use backcountry stove fuel sources. It takes shape as solid – and highly flammable – tablets. The solid fuel stove features a little “oven” where you place the tablets, light them, and then place your pot or pan on top of the flame to cook.
These solid fuel systems are very lightweight as there are no liquid gas containers, fuel lines, or valves to pack. However, this simplicity also means that you have no easy method to control the heat, and precise cooking or simmering is hard to achieve. But for quickly boiling water or rapidly heating a meal, solid fuel may be worth looking into.
Solid Fuel Pros and Cons:
Pros:
- Lightweight
- Easy to use
- No metal gas containers
Cons:
- No heat/flame control
- Doesn’t burn as hot or as consistently as gas stoves
- May not be allowed in all locations as there is no shutoff valve
Wood-Burning Stoves
These stoves are designed to concentrate the heat generated from burning twigs, pine cones, leaves, and other forest floor debris to boil water or cook your food. The main attraction, in this case, is that you don’t need to carry a primary fuel source with you as the forest – should – provide all the fuel you need. But there are plenty of inherent drawbacks to this setup, such as potential damp twigs and leaves, limited to areas with fuel (desert and alpine likely won’t work), and many areas have burn bans for wood fires.
Alcohol Fuel
This fuel is a favorite for many ultralight backpackers due to its simplicity and ease of use. In this scenario, denatured alcohol can be burned in a specialized stove or a DIY device as simple as a food tin or soda can with a few holes. The denatured alcohol is also very easy to find anywhere, from hardware stores to gas stations. However, like the wood and solid-fuel options above, be aware that alcohol stoves may be banned in some locations (where open flame cooking is not allowed) if they don’t have an on-off valve.
Stove Weight
Like all our backpacking gear, weight undoubtedly plays a role in our decision-making. In terms of just the stove (not counting fuel), we’ll see options ranging from 1 oz. or less (a modified soda can for burning denatured alcohol) all the way up to 16 oz. or more (liquid fuel stoves with pump and fuel line). That’s quite the range, and there are definite pros and cons on each end of the spectrum.
Ultralight stove options tend to lack any flame control – such as a flame adjuster for simmering – but they are also easy to use, and the fuel is often straightforward to find anywhere. Meanwhile, heavier options will include many additional features such as simmer control, windshields, and perhaps a heat-exchanger to maximize efficiency. However, more features and parts also mean a more labor-intensive cooking process.
Unless you’re a diehard ultralight thru-hiker or heading into extreme weather or altitude, we tend to recommend stoves in the 2 oz. (such as the MSR PocketRocket) to the 12 oz. (MSR Whisperlite) range. Within this range, you’ll get a good balance between weight, versatility, and flame control.
Price
As always, price is a critical consideration when reviewing the best backpacking stoves. You’ll often see potential prices fluctuating from just about free – i.e., a DIY alcohol-burning stove made from a soda can – up to $200 for a high-end stove with plenty of features and proven reliability.
So think about what you need and, most importantly, expect out of your stove. If you thrive as a minimalist in both features and weight, then you’ll find some very inexpensive options to get you started. However, if you prefer your stove have more features, ease-of-use, and efficiency, then a higher-priced option may be for you.
Also, keep fuel costs in mind, and remember that you’ll always need to purchase fuel to accompany your stove.
MSR PocketRocket 2
Best Canister Stove
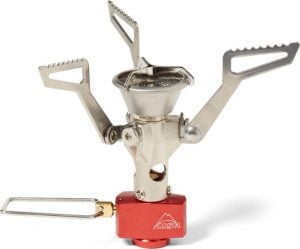
MSRP: $49.94
Stove Type: Non-Integrated
Fuel: Canister Fuel
Weight: 2.6 oz.
Pros: Lightweight – Easy to Use – Very Compact – Good Boil Times
Cons: Small flame area can create a hotspot on the pan – Very susceptible to wind
Closer Look: The original PocketRocket has been a staple in my backpacking kit for years, and I believe the newer PocketRocket 2 is a solid backcountry stove for almost any adventurer. First, it’s remarkably lightweight and compact at only 2.6 oz. yet very powerful. Boil times are agreeably short with this stove (3.5 minutes), but the simmer control means that you can also pair it with a pan for some proper cooking. However, it’s worth noting that a strong wind can cut down on the PocketRocket’s efficiency, and the tall, screw-on design can feel unsteady with some larger pots (but stabilizers are available). But for a reasonably accessible price, the PocketRocket 2 offers the perfect balance between versatility, power, and weight.
It’s also worth noting that MSR beefed up this stove’s cold-weather performance with the PocketRocket Delux – featuring a built-in pressure regulator to combat cold-induced pressure changes.
Find Your PocketRocket 2 Stove
Soto Fusion Trek
Best Canister Stove for Cold and Wind
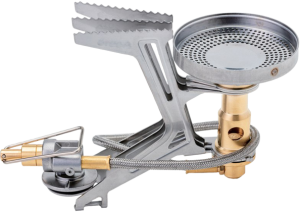
MSRP: $94.95
Stove Type: Non-Integrated
Fuel: Canister
Weight: 6.4 oz.
Pros: Good wind resistance – Excellent stability for a canister stove – Decent cold-weather performance
Cons: More expensive and heavier than other, basic, canister stoves
Closer Look: Although I love canister stoves, my main gripes always focus on stability and poor wind performance, but the Soto Fusion Trek solves both problems. First, the stove uses a fuel line to connect to the fuel canister, eliminating the need to screw into the top of the canister directly, bringing the stove’s center of gravity much closer to the ground for added stability. The Fusion Trek also uses Soto’s WindMaster technology to better shield the flame from pesky wind. Both of these benefits, however, come with a tradeoff in the form of price and weight. But for regular backpackers who know that canister fuel is their go-to and are ready to invest in a robust and feature-rich stove, the Fusion Trek may be for you.
Find your Soto Fusion Trek Stove
JetBoil Flash
Best Integrated Stove for Boil-Only
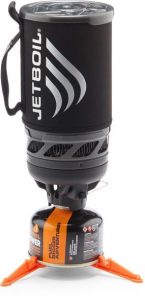
MSRP: $114.95
Stove Type: Integrated
Fuel: Canister
Weight: 13.1 oz. (including pot)
Pros: Very short boil time – Good wind resistance – Pot included with the stove
Cons: Heavy – Boil-only and not intended for cooking
Closer Look: For hikers looking only for warm drinks and hot water for dehydrated meals, the Jetboil Flash is one of the best backpacking stoves on the market for you. The integrated design features a heat exchanger to quickly boil water – just 100 seconds for 16 fl oz. – which also does a good job blocking the wind in most conditions. Jetboil also made this a one-and-done purchase with the integrated pot, so all you need is a fuel canister, and your cooking system is ready for the backcountry. But remember that this simplicity also introduces limits. The pot is for boiling water only and shouldn’t be used for any other type of cooking, and can’t be swapped out for a frying pan. The extra, integrated features also add a lot of weight to this stove, making it a fairly heavy option compared to other canister stoves when all’s said and done.
Find Your Jetboil Flash
Jetboil Minimo
Best Integrated Stove for Cooking
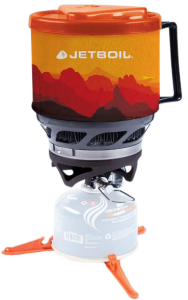
MSRP: $154.95
Stove Type: Integrated
Fuel: Canister
Weight: 14. Oz. (Including pot)
Pros: Good boil time – Can simmer for proper cooking – Pot included
Cons: Expensive – Heavy – Lower wind resistance than other Jetboil stoves
Closer Look: If the idea of an integrated stove is appealing, but you want more versatility than the standard boil-only option, look no further than the Jetboil Minimo. This stove uses the same integrated heat-exchange technology as the Flash stove above but also includes a built-in regulator valve for simmering. That means you can also cook in this pot in addition to just boiling water. Now, the nature of the integrated design still means you can’t swap out the pot for a pan or different vessel, but the increased cooking flexibility is definitely a plus. Keep in mind that – compared to the Jetboil Flash – we sacrifice boil-time and wind-proofing for versatility in this case. But if this added functionality is important to you, the Minimo is certainly one of the best backpacking stoves out there.
Find Your Jetboil Minimo Stove
MSR WhisperLite International
Best Liquid Fuel Stove
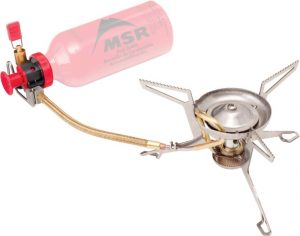
MSRP: $129.95
Stove Type: Non-Integrated
Fuel: White Gas, Kerosene, Unleaded Gasoline
Weight: 10.9 oz. (Not including fuel bottle)
Pros: Very versatile and can burn multiple fuel types – Stable design – Included windscreen – Refillable fuel bottle
Cons: More labor-intensive cooking process with pump and priming – Heavier and bulkier than other options
Closer Look: The MSR Whisperlite has been a solid stove choice for many outfitters for longer trips across the backcountry guiding industry. It offers excellent performance, a refillable fuel bottle to cut down on waste, and a very stable cooking surface when preparing delicious camp cuisine. What’s more, the Whisperlite International can burn white gas, kerosene, or even unleaded gasoline – making it incredibly versatile and easy to operate on any international backpacking trip. I’m a particular fan of the wide stove legs that provide a very stable surface – as opposed to the PocketRocket 2, which can feel a little wobbly at times as it’s perched on top of the fuel canister. Keep in mind that the Whisperlite takes more effort to operate as you’ll need to use a pump and priming cup in order to get the fuel flowing, but this and the added bulk may well be worth it for its solid performance and versatility.
The MSR Whisperlite Universal also adds canister fuel (isobutane-propane) onto the list of useable fuel types.
Find Your MSR WhisperLite Stove
Solo Stove Lite
Best Wood Burning Stove
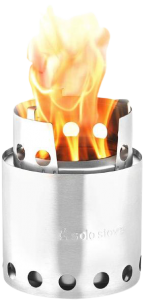
MSRP: $70.00
Stove Type: Non-Integrated
Fuel: Wood
Weight: 9 oz.
Pros: No gas or fuel canisters needed – Easy to use
Cons: Some areas don’t permit open-fire cooking – Can make pot dirty with soot/smoke – Limited to areas with adequate sticks on the ground
CLOSER LOOK: Folks looking to ditch fuel canisters and embrace the rustic aesthetic of wood-fired cooking will love the Solo Stove Lite. The intricate design concentrates the flame for maximum cooking power while circulating air for a hot and complete burn. However, this stove does limit you to hiking in reasonably forested areas, so you have fuel nearby – the desert will get tricky. Lastly, keep in mind that many areas and national parks have burn bans that do not permit this type of stove/cooking.
Find Your Solo Stove Lite
Honorable Mentions

Esbit Solid Fuel Stove
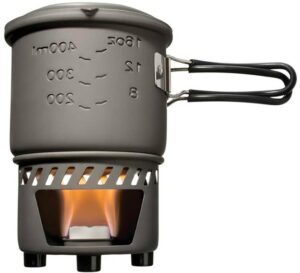
MSRP: $39.95
Stove Type: Non-Integrated
Fuel: Solid Fuel Tablets
Weight: 7 oz. (including stove and pot)
Pros: Very lightweight –Tablets are easily packable
Cons: No flame control – Slow boil time – Fuel tablets are messy to clean up after burning
CLOSER LOOK: Esbit has been working very hard to make a lightweight and packable stove, and they’ve done a good job with this latest iteration. The stove and 0.6-liter pot weigh in at only 7 ounces, which is perfect for solo hikers looking to move light and fast. The fuel tablets are easy to use and light. However, once they’re lit, they’re lit, and you have no flame control. This makes the Esbit mainly a boil-only option or perhaps for cooking basic pasta. More complicated cooking is definitely out with this pot. But all-in-all, the Esbit stove works well and is definitely a good option for hikers who want to cut out bulky fuel bottles or canisters from their bags.
Find Your Esbit Solid Fuel Stove
MSR WindBurner Stove
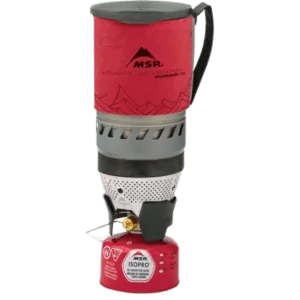
MSRP: $169.95
Stove Type: Integrated
Fuel: Isobutane-Propane Canister
Weight: 15.5 oz. (not including fuel)
Pros: Integrated design resists wind – Long-lasting and durable – Boils water very quickly
Cons: Heavier and more expensive than the competition
CLOSER LOOK: MSR’s contribution to the world of integrated stoves takes shape as the Windburner, and it sure lives up to its name. The flame is extremely well protected, practically canceling out all wind effects on your cooking and allowing you to boil water very quickly in gusty conditions. However, this superior performance adds both weight and cost to the equation, making the Windburner a substantial investment for the backcountry. But for hikers often tackling exposed and windy locals, the Windburner may certainly be worth the weight and cost.
Find Your MSR Windburner Stove
SOTO Windmaster Stove
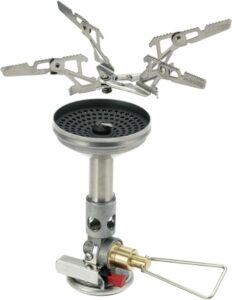
MSRP: $64.95
Stove Type: Non-Integrated
Fuel: Isobutane-Propane Canister
Weight: 3.1 oz.
Pros: Good wind protection for a non-integrated stove – Built in ignitor
Cons: Expensive – Heavier than the competition
CLOSER LOOK: For a less expensive cousin of the burly SOTO Fusion Trek, we have the Windmaster here. The recessed flame cup provides adequate wind protection in gusty conditions while the built-in ignitor is a handy and convenient addition. But the Windmaster is slightly heavier and more expensive than its competition – in part due to the stable 4-prong support and ignitor. Therefore, we consider the Windmaster a good investment for those who expect windy conditions but don’t want to invest in expensive integrated stoves and still want some flame control.
Find Your SOTO WINDMaster Stove
Optimus Crux Canister Stove
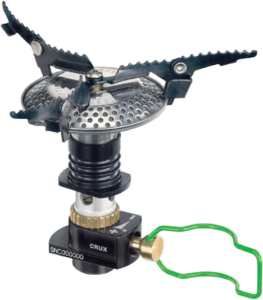
MSRP: $54.95
Stove Type: Non-Integrated
Fuel: Isobutane-Propane Canister
Weight: 2.9 oz.
Pros: Super packable – Wide-diameter flame to limit hot spots
Cons: Susceptible to wind
CLOSER LOOK: When it comes to finding the most packable canister stove, you can’t go wrong with the Optimus Crux. The burner head sits on a ball joint and folds down when not in use for a very slim storage footprint. In fact, the Crux and its included bag can nestle in the tiny concave space on the bottom of your fuel canister, allowing it to take up almost no space in your pack. The notable wide-diameter burner head also improves your flame control and distributes the heat more evenly to avoid hot spots. Lastly, the Crux sits right in the middle of the road regarding weight and cost, making this a solid all-around performer in the world of canister stoves.
Find Your Optimus Crux Stove
Award Winning Trekking Adventures
Since 2005, Wildland Trekking has been providing all-inclusive, guided hiking and backpacking trips across the USA and the world. Explore your world with the hiking experts!

More Information About The Best Backpacking Stoves
Efficiency and BTUs
The heat output from a backpacking stove is often measured in British Thermal Units (or BTUs). Specifically, this unit measures how much energy is needed to heat 1 pound of water by 1 degree Fahrenheit. While not the sole indicator of a stove’s power, it’s a useful point of comparison when comparing different options, and it will often influence your stove’s overall efficiency.
We often think of stove efficiency in two ways: how much time it takes to boil water and how quickly the stove will burn through your fuel. The former benchmark (boil time) is greatly influenced by your fuel – where liquid tends to burn very hot – and by stove features like a heat exchanger or windshield/heat reflector. In terms of hard numbers, a stove that can boil 1-liter of water in 3-5 minutes is considered impressive, while 10+ minutes is relatively slow.
Now to the second point, fuel burn time. If your stove can boil a liter of water in 3 minutes flat but eats through all your fuel in the process, then it’s definitely not an efficient stove. So keep an eye on the “Burn Time” metric listed with most stoves to gauge how one option compares to another.
Weather-Resistance
Weather conditions play a massive role in how your stove will perform. A strong wind will noticeably decrease your stove’s efficiency, as will extreme cold in some cases. To combat these elements, stoves will sometimes include a foil windshield (that also doubles as a heat reflector), a heat exchanger, and/or a pressure regulator to combat pressure fluctuations when your fuel gets very cold.
If you expect to encounter these weather elements, it’s worthwhile keeping an eye open for a stove with some or all of these features to ensure it doesn’t let you down in the field. It’s also worth noting that lower ambient pressures at high altitudes cause water to boil at a lower temperature; that means your food is cooking at a lower temperature, and that means it will take longer to cook your food. Therefore, keep in mind that liquid fuel tends to operate the best at altitude as you can directly maintain the fuel pressure with the pump, and it burns hotter than canister gas.
Packability
Like weight, your stove’s packability also plays a huge role. Space in our backpacking packs is always at a premium. Also like weight, there is a vast range of possible stove sizes. That range follows a similar trend where minimalistic and lightweight options will take up almost no room at all while more feature-heavy options can take up the space of a 1-liter Nalgene bottle.
In this case, it’s very important to consider what you need out of your stove and what space you’re willing to dedicate to carrying it around. If you’re just looking to boil water and nothing else, you can opt for a more compact stove. But if you need a stove that allows you to simmer for proper cooking or includes a windshield, then you should be prepared for it to take up more space in your pack.
How Much Fuel To Bring
It’s always a tricky question when you’re packing before a trip. We certainly don’t want to run out of fuel in the backcountry, but we also don’t want to carry around excess weight and bulk that we don’t end up utilizing. So how much fuel should you bring on a camping trip? Well, let’s take a look at a few points to consider.
Your first task is to add up how many hot meals you plan on cooking and how many people you’ll be cooking for. Most often, this will be breakfasts and dinners for all the days you’re in the backcountry – although some folks opt for cold breakfasts. Once you have this number, also add in how many times you plan on heating water for hot drinks. Now you know all the instances where you’ll be firing up your stove. Second, consider the types of meals you’ll be cooking. Are they quick boil-only meals, or will you be simmering and cooking for extended periods?
Now you have the base information you need to decide on how much fuel to bring. To help you get started, here’s a rough estimate of fuel consumption on many of our guided backpacking trips. As a note, we’re using standard 3.9 oz fuel canisters as our measurement unit and building in a safety factor so we’re not taking our fuel right down to the wire while out camping. So, as a very rough outline, a group of 5-6 people can typically carry 3 fuel canisters for a 5-day trip while cooking hot breakfasts and dinners along with regular hot drinks. For 2 people cooking breakfasts and dinners, 2 canisters is ample for a 5-day trip.
But of course, the best way to gauge your fuel needs is simply to build experience. Therefore, err on the side of caution for your first few trips as you begin to understand your fuel needs. From there, you’ll be a pro a packing the right amount of fuel for all your adventures.
Why Trust Us?
Choosing the right outdoor gear and apparel can be difficult. But at Wildland Trekking, we live and work with hiking gear every single day. It’s an integral part of what we do, and we understand better than anyone how important it is to have the right equipment. In addition to our vast knowledge of backpacking gear, we also offer:
- Independence – our recommendations are not influenced by partnerships or sponsorships with outdoor gear and apparel manufacturers.
- Experience – as one of America’s top guide companies, we take 8,000-10,000 people on hiking and backpacking tours annually. Since our inception in 2005, we have guided more than 75,000 people into the wilderness.
- Cutting Edge Knowledge – we regularly attend trade shows and pay close attention to the leading edge of new developments.
- Up To Date Recommendations – we update our recommendations regularly as new products are developed and released.
- Dedication to our Readers – we know that the gear we select as our top picks will end up in the field with our readers, and we take that responsibility very seriously. We view our readers as guests on our guided trips, just without the guides. We are committed to helping you be as well-outfitted and prepared as possible for your adventures.
*Disclosure: Some of the links above are affiliate links. At no cost to you, we earn a commission on any products purchased through these links. Any proceeds go to supporting our blog and operations. These affiliate links do not influence the products that we include in our gear round-ups. We only recommend products that we 100% support and that we have used in the field.
MORE GEAR RECOMMENDATIONS
Check out our Wildland Gear Guide for more recommendations about hiking, trekking, camping and outdoor gear. We are always adding new products to help our guests and readers make the best choices to outfit their adventures.
- Packing List Quick Links for Wildland Guests
- Wildland Packing List Video
- Best Low Top Hiking Shoes
- Best Boots for Backpacking Trips
- Best Rain Jackets
- Best Rain Pants
- Best Long Underwear
- Best Mid Layers
- Best Tents for Backpacking Trips
- Best Tents for Car Camping Trips
- Best Backpacking Backpacks
- Best Daypacks
- Best Trekking Poles
- Best Sleeping Bags
- Best Headlamps for Hiking
- Best Backpacking Sleeping Pads
- Best Backpacking Water Filters
- Best Hiking Socks
- Best Backpacking Cookware
- Best Hiking Shirts and Tops
- Best Hiking Pants
- Best Camp Shoes
- Best Hiking Shorts
- Best Gaiters
- Best Sun Hats
- Best Sun Hoodies
- Best Hydration Bladders
- Best Duffel Bags
- Best Camp Towels