
5 Epic California Adventure Hikes
California is a wilderness lover’s paradise. In one state you can see the lowest point in North America and the highest peak in the Lower 48. From hot dry deserts to lush temperate rain forests, California has enough to keep a hiker busy for a lifetime. Wondering where to start? Check out this list of 5 epic adventure hikes in the state.
Explore California with Expert Guides
| Trip | Difficulty | Days | Miles |
| The John Muir Trail | Strenuous | 14-21 | 222 |
| The Sierra High Route | Very Strenuous | 20-30 | 195 |
| The Lost Coast | Moderate | 4 | 25 |
| Tahoe Rim Trail | Strenuous | 10-15 | 165 |
| Death Valley – Sea Level To Summit | Very Strenuous | 3 | 27 |
1. The John Muir Trail
The Area
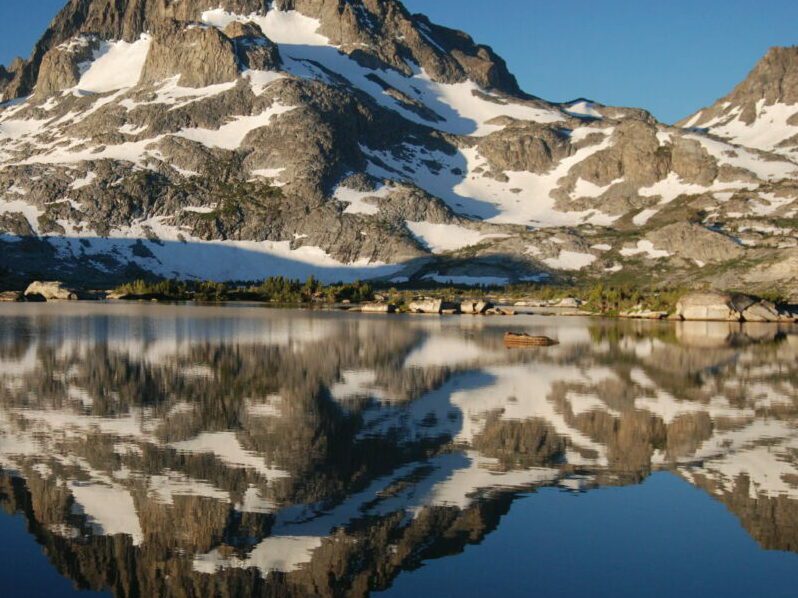
The John Muir Trail covers a significant chunk of the length of the Sierra Nevada Mountains, famously named the “Range of Light” by John Muir. The Sierra Nevada is a mountain wonderland containing 3 National Parks, 2 National Monuments, and 26 wilderness areas. The terrain encompasses soaring granite peaks (including the highest peak in the 48 contiguous US states: Mt. Whitney), vast expanses of alpine tundra, exquisite alpine lakes, and endless miles of coniferous forests including the largest trees in the world.
Trip Overview
The official distance of the John Muir Trail is 211 miles. It tops out on Mt. Whitney at the southern end, 10 1/2 miles from the nearest trailhead. Consequently, the minimum distance you cover doing the whole thing is 221.5 miles. Hikers typically take 2 or 3 weeks to complete the entire length. This usually requires food caches or sending food ahead to one or more of the places willing to hold caches for hikers.
Elevations range from 4,000 feet at the trail’s northern end in Yosemite Valley to 14,505 feet on the southern end at the summit of Mt. Whitney. However, most of the trail is at elevations above 8,000 feet with significant sections above 10,000 feet.
Getting There
The JMT begins at the Happy Isles trailhead in the back of Yosemite Valley. Be warned that traffic in the valley can be horrendous on summer weekends. As a result, finding parking can be an issue. Plan ahead. For detailed directions, information on parking, and other travel information see the Yosemite National Park website.
Itinerary
Unless you want to spend a month on the trail, the trick is to cover lots of distance every day. The mantra is 10 before 10 (10 miles before 10am). The first section, from Yosemite Valley to Red’s Meadow, is a little over 57 miles. This is a good place to get your legs and lungs ready for the longer and higher sections to come. Plus, at only 1/4 mile off the trail, Red’s Meadow Resort is a great place for your first food cache.
After leaving Red’s Meadow, the trail goes high and stays there. Climb through Silver Pass and Seldon Pass, both near 11,000 feet, and hike a little over 50 miles before reaching Muir Trail Ranch. This is the only other good resupply point.
The last part of the trail is the longest and highest. From Muir Trail Ranch it’s just over 100 miles to the top of Mt. Whitney. Along the route the trail crosses Muir, Mather, Pinchot, Glen, and Forester Passes, all over 11,000 feet. Finally, we reach the zenith of the Lower 48, the summit of Mt. Whitney at 14,505 feet.
Permits, Fees, Reservations…etc.
Permits for the JMT are a little complicated. Hikers must obtain both a permit to start their hike at the Happy Isles trailhead and a permit to exit Yosemite via Donohue Pass. Because both permits have quotas, applying well ahead of time is a very good idea. If your start date isn’t very flexible, apply for your permit using the online Yosemite Wilderness Permit Request Form. Submitting an application 24 weeks in advance of your desired start date will get you in the lottery for a permit for that day. Got a little more flexibility on your start date? Use the JMT Rolling Lottery Application. You may not get the exact start date you want, but you’ll have a better chance of success.
Another option is to start from another trailhead in Yosemite. However, only a few allow exiting the park via Donohue Pass and you skip a small part of the trail. It’s a small sacrifice, but it saves you from scrapping the whole trip.
When to do this Trip
Snow cover on the higher parts of the trail and dangerous creek crossings can make the trail virtually impassable early in the season. When the trail will be passable depends on how much snow fell the previous winter. Usually a late June start date provides a mostly clear trail. Early winter storms can occur beginning in September so planning to finish any later than mid-September can be dicey.
Hike Yosemite with a Guide
Guided Yosemite backpacking trips are available, and are a stress-free, exciting way see part of the John Muir Trail. The tour company handles permits, gear, transportation, meals, and provides a professional guide so you can focus 100% on enjoying your adventure. Read more…
Award Winning USA Hiking Vacations
2. The Sierra High Route
Trip Overview
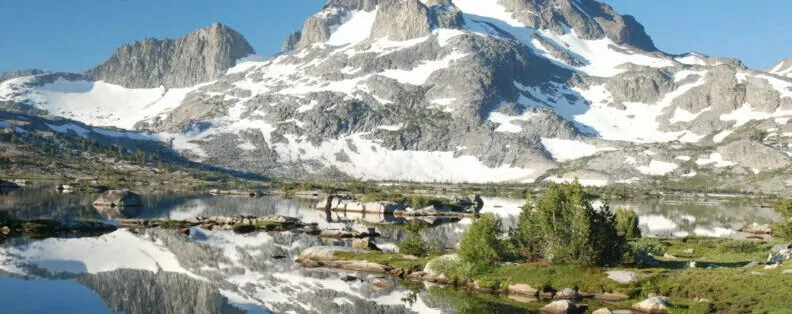
Looking for the ultimate mountain hike challenge? Starting in Kings Canyon National Park and ending north of Yosemite, this 195 mile route is mostly cross-country and very high altitude. Like the John Muir Trail described above, it is entirely within the Sierra Nevada Mountains. Unlike the JMT, however, you’ll have most of this route to yourself. It winds through some of the most spectacular and remote mountain country in the lower 48, the Eastern Sierra Nevada. Some of it (roughly 60 miles) is on marked, maintained trails. But the majority crosses mountain meadows, granite slabs, and talus-covered high passes completely off trail. Highly developed navigation, route finding and class 3 scrambling skills are often required.
Getting There
This hike can be done either direction. Start at the Cedar Grove trailhead in Kings Canyon National Park and end at Twin Lakes, a private resort north of Yosemite, or vice versa. Note that neither trailhead is serviced by public transportation. Both are quite remote and they are even further apart than it would seem based on the hike. King’s Canyon is reached from the west side of the Sierra Nevada out of Fresno. Twin Lakes is on the east side of the mountains and accessed via Hwy 395 near Bridgeport.
Itinerary
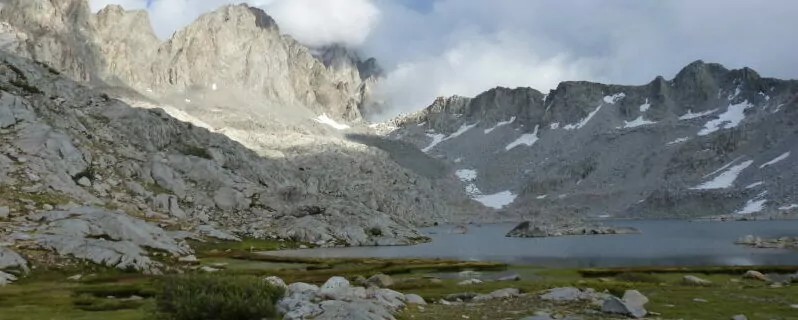
Starting from Cedar Grove the trail goes high very quickly. In the first 40 or so miles, Hikers cross into a granite cirque-filled wonderland well above treeline passing Lake Basin, Upper Basin, Palisades Basin, Barrett Lakes Basin, and Dusy Basin. Next, drop down onto the John Muir Trail for a short stint of easy walking over Muir Pass and through Evolution Basin.
After Evolution Basin leave the trail (and King’s Canyon National Park) behind to traverse Humhrey’s Basin, Bear Lakes Basin, and Mono Lakes Basin. Get ready for a couple challenging passes: Silver Divide and Mammoth Crest before dropping down to Devil’s Postpile. This is the best opportunity for resupply at Red’s Meadow Resort near Mammoth Lakes.
After picking up your new food at Red’s, go high again to cross the Ritter Range and enter Yosemite National Park. From here it is only 2 or 3 days of hiking to the only road crossing along the entire route, Hwy 120 neat Tuolumne Meadows in Yosemite. The road is the clue that the end is in sight. Roughly 25 miles of Yosemite’s North Country remains before the end of the hike at Twin Lakes.
Permits, Fees, Reservations…etc.
If you start from the south get your permit from King’s Canyon National Park. The northern (Twin Lakes ) trailhead is just outside Yosemite in the Hoover Wilderness. Contact the Inyo National Forest for a permit.
When to do this Trip
Because this hike stays at very high elevations for its entire length, the window for hiking it is pretty short. In dry years the ground can be snow free by early June but many years the snow can linger into late July or early August. Count on very cold weather and possible early winter storms by late September. All told, mid-August to mid-September is the most reliable window.
Hike THIS AREA with a Guide
Guided Sequoia-Kings Canyon backpacking trips are available, and are a stress-free, exciting way to see this area. The tour company handles permits, gear, transportation, meals, and provides a professional guide so you can focus 100% on enjoying your adventure. Read more…
Explore Your World. Top Rated Hiking Adventures
3. The Lost Coast
The Area
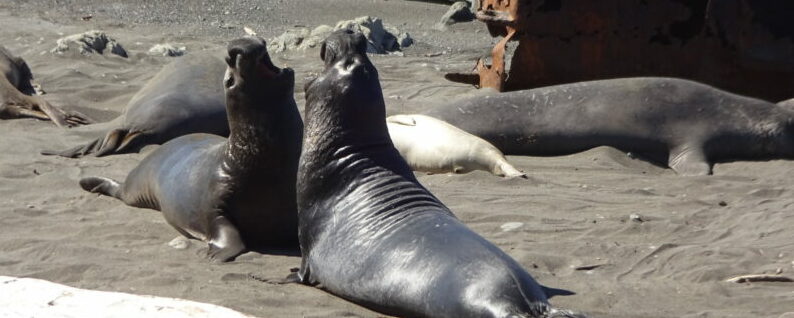
With vast empty beaches, windswept ocean bluffs, a historic lighthouse, and wildlife found nowhere else, the Lost Coast is a very unique place. It is the longest section of undeveloped coast in the lower 48. It was formed when the builders of California Highway 1, the coastal highway, were forced to move the road inland to bypass the rugged terrain of the King’s Range.
Trip Overview
Due to prevailing winds from the northwest, this trip is usually done north to south. It’s a 25 mile hike that is usually done in 3 or 4 days. The wildcard here is the tides. Several sections of the trail are impassable at high tide so hikers need to time it right to pass these areas. Add in long sections of sand, gravel, and pebbles and this 25 mile hike can feel significantly longer.
Getting There
For this trip, getting there is half the battle. The hike starts at the Mattole Campground and ends at the small isolated community of Shelter Cove. Both are about 250 miles north of San Francisco and at the end of long, narrow, curvy roads. Don’t expect to get to either place in a hurry. Your choices are to either place a car at the end of the trip in Shelter Cove then drive back to Mattole after the hike (a 2 hour drive on awful roads) or use a shuttle service to take you from Shelter Cove to Mattole.
Recommended Day by Day Itinerary
Day 1:
The first two miles of the trail winds through dune grass, after which you reach the first of three tidal zones, stretches of beach impassable at high tide. Navigating with the tide charts, make your way through the ½ mile stretch, after which the Punta Gorda Lighthouse comes into view. Known as the “Alcatraz” of lighthouses due to its isolation and solitude, Punta Gorda makes for wonderful photography. The light house, first lit in 1912, provided a beacon to ships until the 1950’s. After the lighthouse, continue on to Sea Lion Gulch where the cliff becomes too steep for the trail to continue. Climb roughly 200 ft up on the bluff and then finish the day with 2 more miles along the beach. Camp along Cooskie Creek, a pristine creek with stunning ocean views.
Day 2:
This day begins with a hike along a 2 mile stretch that is impassable at high tide, so time your departure carefully. Following tide charts, make your way along rough and wet cobblestone where a coastal creek flows into the ocean. Beyond the tidal zone stop for a quick snack along and then continue down a nice dirt trail, a wonderful section of hiking. For the next few miles ascend a densely forested ridge with with views of prominent peaks of the Kings Range to the left, and eventually drop down to a major valley with a crystal clear creek. Fill up water here and enjoy the scenery, then continue another 2.8 miles to camp beside lovely Big Flat Creek. Total hike is 9.8 miles, 500 feet elevation gain/loss.
Day 3:
Today’s hike begins with more timing of the tides. Only twice a day during low tide does today’s initial trail emerge. The mountains rise up directly out of the sea and the beach is a thin shelf along the cliffs. This section is steep, rocky and sometimes involves timing travel with the patterns of the waves. Most think this is the most beautiful part of the trail. After roughly 4 miles you’ll approach a beautiful creek and the beach opens up wide enough for high tide travel. Make your way toward Gitchell Creek or Horse Mountain Creek to camp for the last evening of the hike. Total hike is 6.7 miles, 200 feet elevation gain/loss.
Day 4:
On the last day pack up and head south toward the Black Sands Beach trailhead. Walking along the black sand, forests of Douglas fir covering the hillsides and homes along Shelter Cove come into view. The short hiking day today allows time for the long drive back to civilization in Sacramento or San Francisco. Total hike is 1.8 miles, 200 feet elevation gain.
Permits, Fees, Reservations…etc.
Permits are required for the Lost Coast and can be hard to get during the summer, especially for weekends or holidays. 60 people are allowed to start the hike each day in the summer, 30 per day the rest of the year. Get your permit via the recreation.gov web site.
When to do this Trip
While this trip can be done any time of year, even in summer the weather on the Lost Coast can be wet, cold, and very windy. The best chance for good weather is in late summer and early fall. Rain is possible any time of year but heavy rain in the winter and spring can make the creeks dangerous to cross.
Hike The Lost Coast with a Guide
Guided Lost Coast backpacking trips are available, and are a stress-free, exciting way to do this trip. The tour company handles permits, gear, transportation, meals, and provides a professional guide so you can focus 100% on enjoying your adventure. Read more…
4. Tahoe Rim Trail
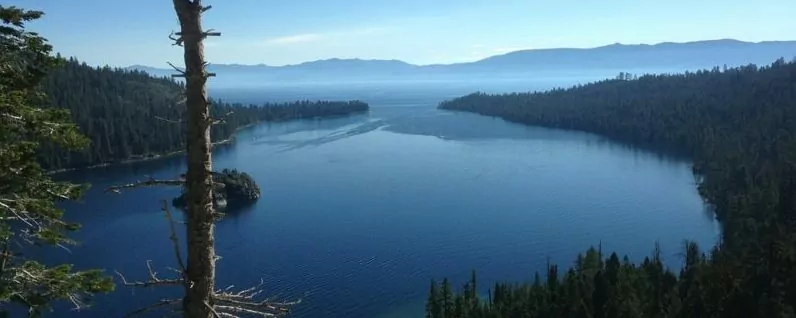
The Area
Perched high in the Northern Sierra Nevada mountains, Lake Tahoe is the largest alpine lake in North America. At 22 miles long by 12 miles wide it is so big that the curvature of the earth is clearly visible from the lake surface. It is surrounded by high mountains with several peaks over 10,000 feet, nearly all of which have stunning views of its crystal blue water. The terrain and climate are typical Sierra Nevada; serene coniferous forests with almost perfect weather in the summer.
Trip Overview
This 165 mile hike forms a loop around Lake Tahoe at or near the summit of the lake’s watershed. It encompasses over 24,000 feet of elevation change and passes through 2 wilderness areas. The high point is Relay Peak at 10,338 feet.
Getting There
Lake Tahoe is roughly 100 miles east of Sacramento or 50 miles west of Reno, Nevada. There are 2 main access routes from the west: Interstate 80 and US Hwy 50 out of Sacramento. From the east access is via I80 out of Reno or US 50 out of Carson City. There are 6 main trailheads where the trail crosses roads in and out of the Basin. Which trailhead you pick isn’t terribly important, but starting at the Hwy 89 crossing in Tahoe City means finishing with the best section of the trail. See the itinerary below.
Itinerary
Tahoe City to Hwy 267
The trail can be divided into 7 sections by roads. The sections aren’t equal in length so some planning is needed to make sure you are supplied correctly for each section. For this itinerary assume the start is at the low point of the hike, the Truckee River outlet in Tahoe City. This section covers about 20 miles from Hwy 89 in Tahoe City to Hwy 267 near Brockway Summit. Figure 2-3 days to complete it, but you’ll want more supplies than that. There are no services where the trail crosses Hwy 267. In addition to the usual Sierra forests and lakes, this section features some lovely volcanic formations, a rare sight in these mountains.
Hwy 267 to Hwy 50
Another 20 miles past Hwy 267 hikers reach Hwy 431 near the summit of Mt. Rose. This stretch features beautiful views of the Sierra Nevada mountains and the Carson Range. It also features a change of states from California to Nevada, and the highest point on the trail, 10,338 foot Relay Peak. After crossing Hwy 431 hike another 23 miles to cross Hwy 50 at Spooner Summit. This section is packed with sights including fantastic long-distance views into Nevada’s Great Basin, fantastic views of Lake Tahoe, and reminders of Tahoe’s history in the form of log flumes used to move timber out of the forest.
Hwy 50 Hwy 89
Next comes 18 miles on or near the ridgeline separating Lake Tahoe from the Carson Valley far below. Expect stunning views of both interspersed with lovely aspen and fir forests from Spooner Summit to your next road crossing, Hwy 207 (known locally as Kingsbury Grade) near Daggett Pass. After Daggett Pass continue south along the spine of the Carson range and past sublime alpine lakes another 22 miles to Big Meadow. Cross Hwy 89 at Big Meadow to continue.
Hwy 89 to Tahoe City
The following 18 miles to Hwy 50 makes a big turn from south then west then back to north. Hikers pass more stunning alpine lakes and small mountain streams in forests of pine, aspen, and fir. The Hwy 50 crossing is a good place to plan a resupply as the next section is the longest of the route and has no highway crossings. After crossing Hwy 50 Echo Lakes quickly come into view. Stop at the Echo Lakes resort for a last cold drink before launching into Desolation Wilderness, a wonderland of open granite and sparkling blue lakes. This final 50 mile stretch through Desolation and Granite Chief Wildernesses follows the Pacific Crest Trail for much of it’s length and rarely ventures out of spectacular granite wilderness. Upon completing this last stretch the Tahoe Rim Trail descends back down to the starting point at Hwy 89 in Tahoe City.
Permits, Fees, Reservations…etc.
Only one section of this hike requires a permit, the section on the southwest portion of the lake through the Desolation Wilderness. The Desolation Wilderness is extremely popular and permits here can be difficult to obtain. Fortunately, through hikers can bypass the normal Desolation quotas by contacting the Forest Service Supervisor’s Office. For more information on permits and regulations, see the Tahoe Rim Trail Association’s web site.
When to do this Trip
When to do this hike depends greatly on the weather the previous winter. In some years the trail remains largely snow-covered into July. Hikers can even encounter snow cover into August. In other years the snow is mostly gone by he end of May. While wildflower displays can be stunning in early season, mosquitoes and difficult creek crossings make late season better for some hikers. The weather is usually warm and dry from late May into early September.
Hike the Sierra Nevada Mountains with a Guide
Guided Sierra Nevada backpacking trips are available, and are a stress-free, exciting way to see this area. The tour company handles permits, gear, transportation, meals, and provides a professional guide so you can focus 100% on enjoying your adventure. Read more…
5. Death Valley – Sea Level To Summit
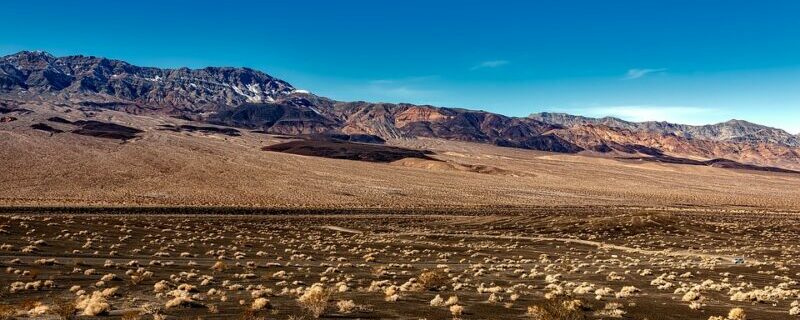
The Area
Straddling the border between Nevada and California, Death Valley National Park is home to the lowest point in North America. It boasts more than 3 million acres of wilderness and is defined by vast, otherworldly landscapes. Death Valley is the hottest, driest place on planet Earth in the summer, but is a world-class winter hiking destination.
Trip Overview
This trip is all about the vertical. It begins near Badwater, the lowest point in North America at 289 feet below sea level and ends on top of Telescope Peak at over 11,000 feet.
Getting There
This is a point-to-point hike that starts and ends at somewhat remote trailheads, both in Death Valley National Park. Death Valley is usually accessed from the east at Las Vegas, or from Bishop to the west. You’ll need to place a car or arrange for a pickup at the end point, the Mahogany Flat campground, accessed via either Hwy 190 or Panamint Valley Road. Begin your hike at Shorty’s Well, accessed via the West Side Road. See Death Valley map here.
Recommended Day by Day Itinerary
Day 1:
At Shorty’s Well, 250 feet below-sea-level, don your packs and hike toward Telescope Peak looming in the west. The first day’s route follows along an old mining road, hand-dug by a kindly, 65-year-old miner, Alexander ‘Shorty’ Borden. Today’s hike immerses you in a rugged and slanted desert landscape for the first several miles as you steadily gain elevation. Pass wind-sculpted rock, creosote, and black brush while being treated to ever-growing views of the vast salt-flats and mountains behind and below.
Soon after Shorty’s Road takes you into Hanaupah Canyon, you’ll find some shade for a relaxing lunch. The last two miles up Hanaupah Canyon’s south fork will end near the lush oasis of Hanaupah Spring. There, make camp and enjoy a fresh dinner and spring water under the western shadow of the Telescope Peak ridgeline. Total hike is 8 miles, 3500 feet elevation gain.
Day 2:
Top off your water before starting the day by hiking down to the canyon confluence. There, leave the trail and begin to ascend in earnest as you crest the massive east-west ridgeline and hike high above the deep forks of Hanaupah Canyon. Views for the remainder of the trip will be absolutely extraordinary. You’ll steadily climb into a forest of juniper and piñon, and occasionally enjoy hiking on flat portions along the ridgeline.
By mid-afternoon, select a flat area for your forest camp with clear sunset views of Death Valley and the many mountain ranges and basins between you and Las Vegas. Have dinner in this twilight glow, surrounded by boundless beauty—and the growing silhouette of Telescope Peak. Total hike is 8 miles, 3800/500 feet elevation gain/loss.
Day 3:
The hardest portion of the hike culminates at the lower slope of Telescope Peak as the forest opens to a 1.5-mile, seemingly near-vertical mountain meadow of grass and talus. Scattered, centuries-old limber pines will greet you as you hike toward the sky.
Finally, you’ll reach the Telescope Peak Trail and encounter millennia-old bristlecone pine trees. With victory in reach, drop your packs and hike to the summit of Telescope Peak at 11,049 feet above sea-level and take a moment to enjoy what truly is one of the great hiking feats in America. With spectacular vistas of Death Valley to the east, Panamint Valley to the West, Mount Charleston above Las Vegas, and the fabled Sierra Nevada Range and Mount Whitney, your eyes will feast on the views of a lifetime.
After signing the summit register, retrieve your packs for the last five miles of the trip, down to the Mahogany Flat campground. Pick up your car here and head down to Panamint Springs for a well-earned meal. Total hike is 11 miles, 4800/3000 feet elevation gain/loss.
Permits, Fees, Reservations…etc.
Permits are recommended but not required for backpacking in Death Valley National Park See the Backpacking Information Page on the NPS web site for more information.
When to do this Trip
Timing for this trip can be tricky. In the summer the floor of Death Valley, where the hike starts, is often the hottest place on the planet with temperatures frequently exceeding 120 degrees. However in winter the top of Telescope Peak can be buried in several feet of snow. While spring hikes are certainly possible, fall is the best time for this hike. Temps at the bottom will have diminished somewhat from the brutal highs of summer but the big snows on the summit usually hold off until winter. October can be an ideal month for this hike.
Hike Sea Level To Summit with a Guide
Guided Death Valley backpacking trips are available, and are a stress-free, exciting way to do this trip. The tour company handles permits, gear, transportation, meals, and provides a professional guide so you can focus 100% on enjoying your adventure. Read more…
Wildland Trekking Hiking Adventures
 As the world’s premier hiking and trekking company, Wildland believes in connecting people to fantastic environments in amazing ways. The state of California offers an array of incredible hiking and trekking experiences. Wildland Trekking provides over 30 different multi-day hiking and backpacking adventures in the California. Read more about our California Hiking Adventures.
To learn more about our guided backpacking trips and all of our award-winning hiking vacations, please visit our website or connect with one of our Adventure Consultants: 800-715-HIKE

