
Top 3 Olympic National Park Backpacking Trips

Note: This post was originally published December 2019, and has been updated with the latest route and permit info as of February 2023.
Hiking and backpacking in Olympic National Park is an incredible adventure, a one of a kind experience in the United States. Olympic boasts the only temperate rainforest in the U.S. as well as two other distinct ecosystems. Backpacking through this park will allow you to experience not only the Hoh Rainforest, but perhaps also the rugged Olympic Mountains with jagged cliffs and abundant wildlife. Alternatively, you can also backpacking along the park’s unique Pacific Northwest Coastline to explore tide pools bursting with life and watch sea otters and seals slipping between the awe-inspiring rock formations jutting from the chilly water.
As you may expect, epic backpacking opportunities are everywhere in such a beautiful wilderness landscape. But which are the best? Don’t worry about digging through lists and reviews! We’ve picked out the top three backpacking trips to Olympic National Park so you can jump straight to planning your next incredible hiking vacation.
All-inclusive Pacific Northwest Adventures
While backpacking in Olympic is an amazing experience, it can also be rather intimidating, especially if you’ve never done it before. At Wildland Trekking, we offer a wide range of backpacking trips to Olympic National Park. We’ll handle all the gear, permits, and trip transportation logistics so you can relax and enjoy the adventure.
Here are the top 3 backpacking trips in Olympic National Park. We’ll discuss each one in detail before, but here is a quick overview of what each trail is like.
-
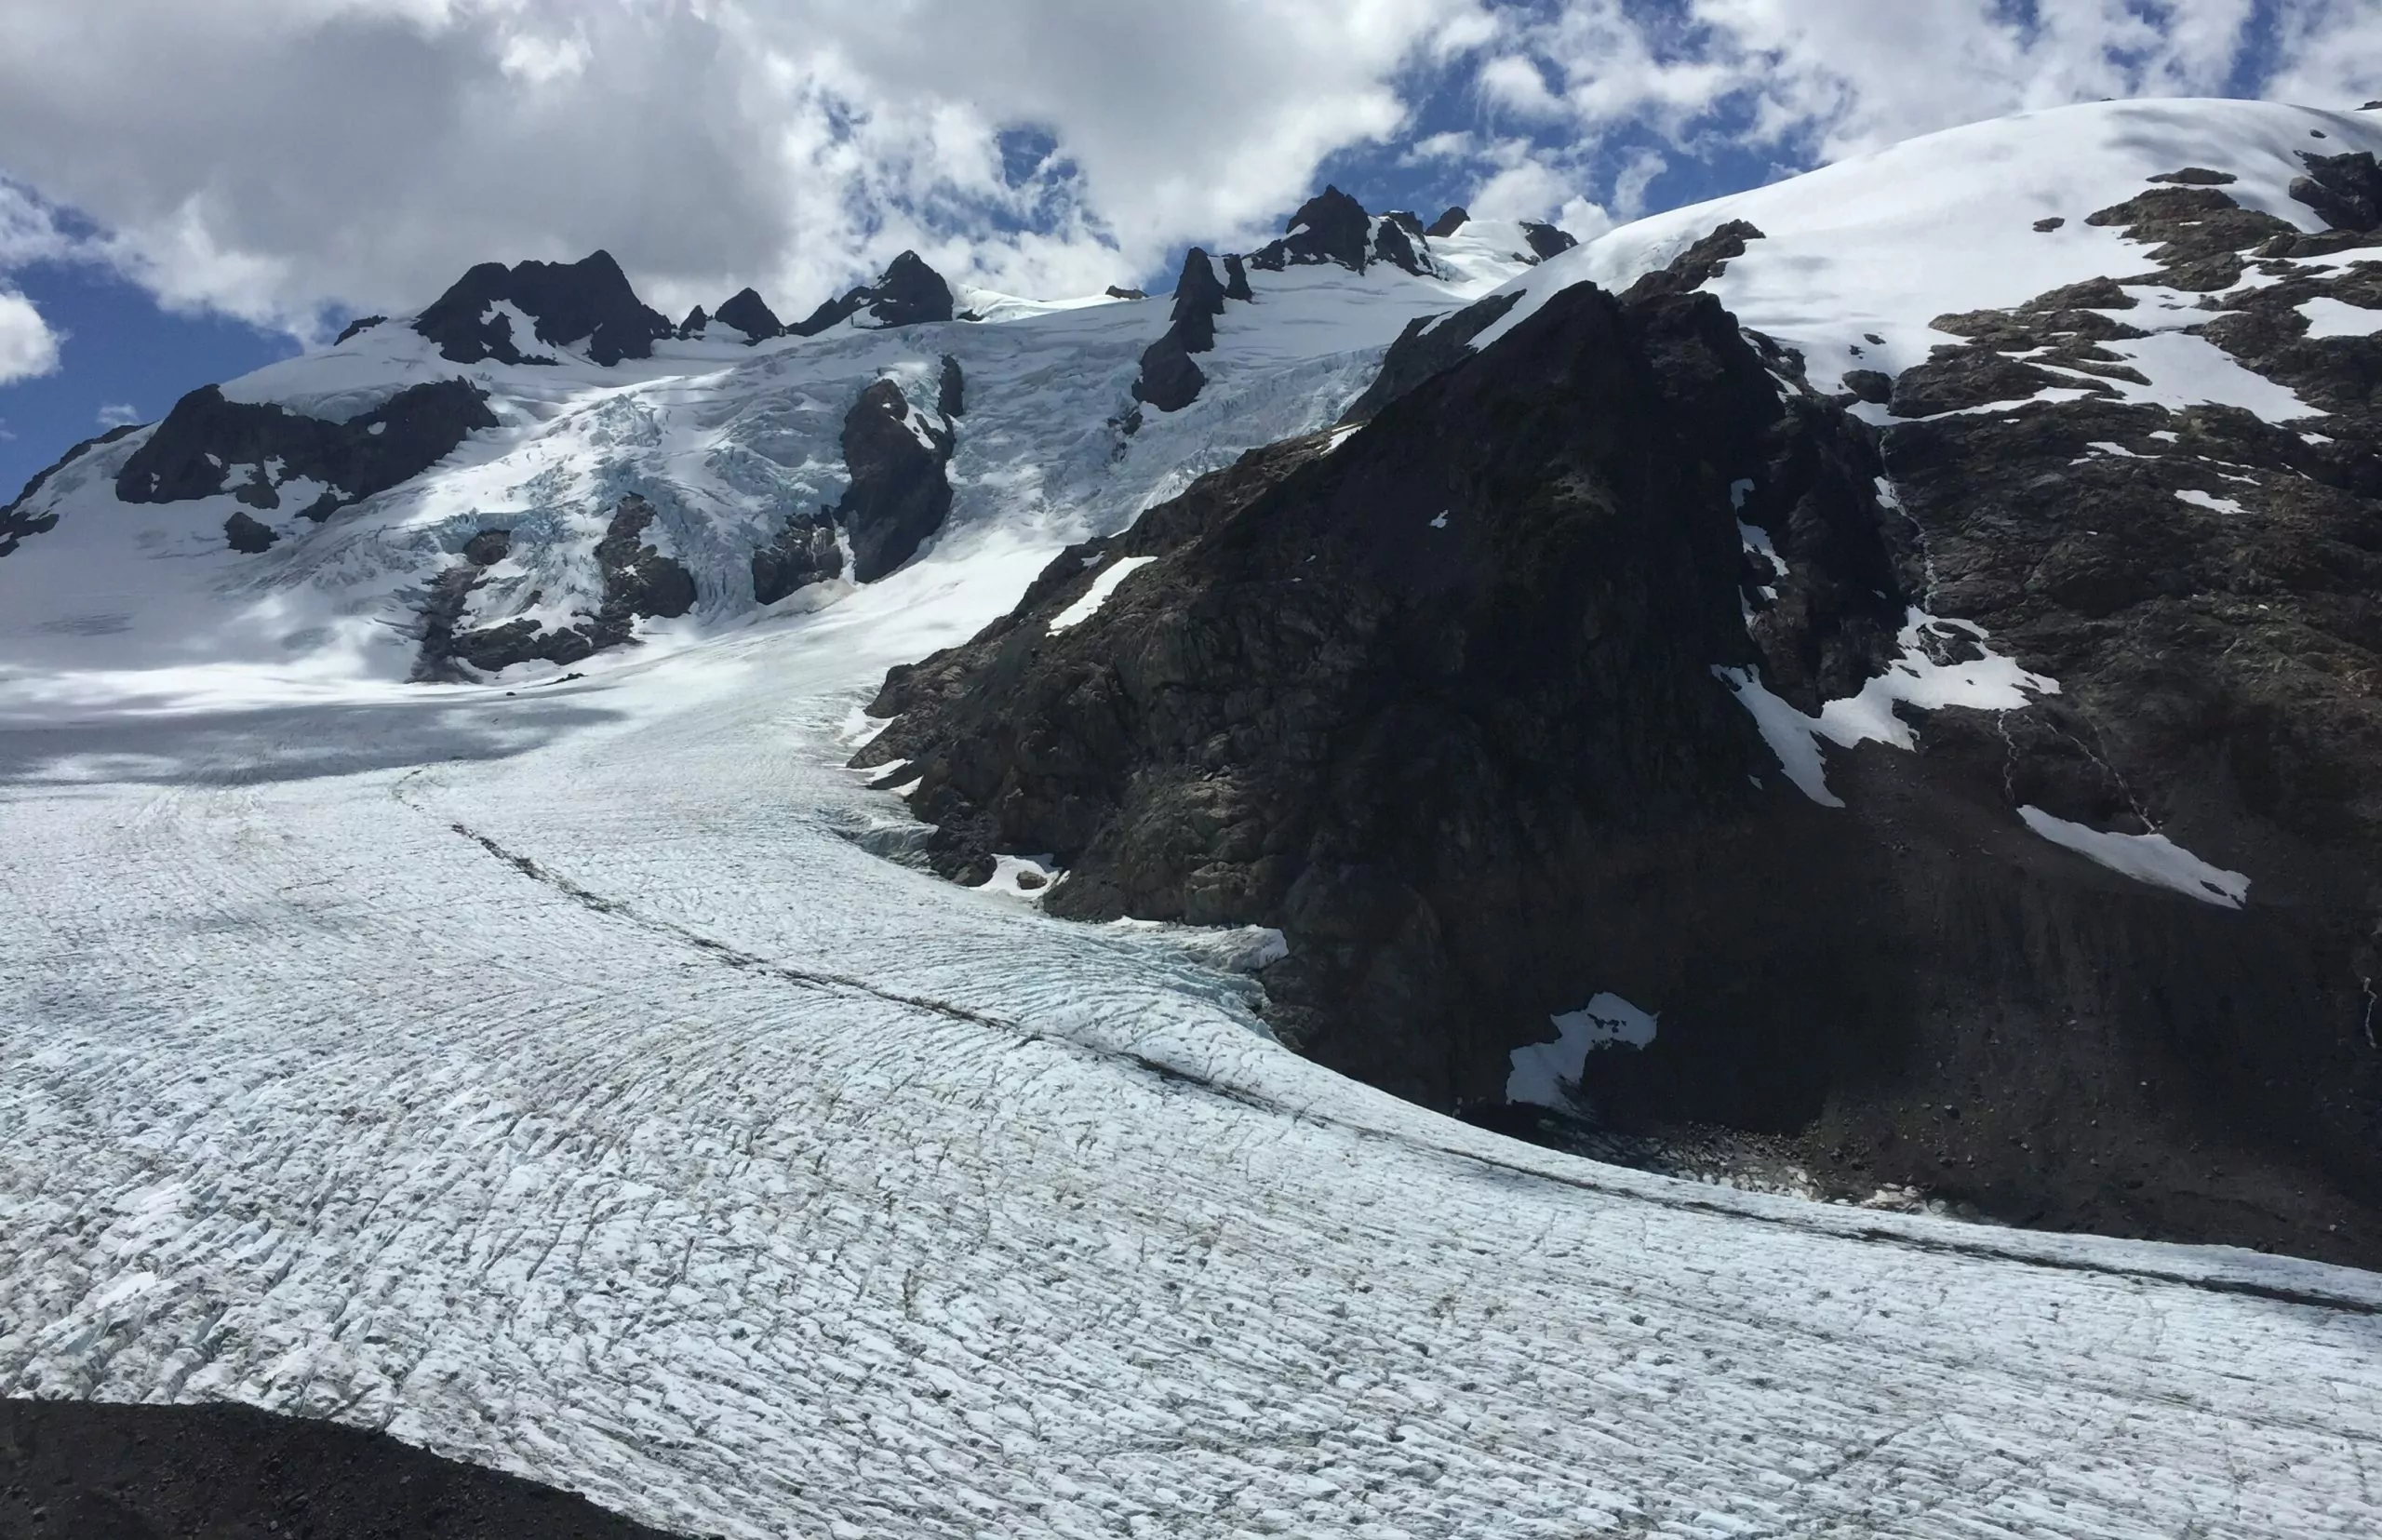
Hoh Valley to Blue Glacier – 5 days – Strenuous
-
The North Coast – 3 days – Moderate
-
Enchanted Valley – 4 days – Moderate
1. Hoh Valley To Blue Glacier
The Hike
This incredible backpacking trip includes almost everything Olympic National Park has to offer. Lush rainforest packed with wildlife, beautiful lakes, alpine meadows, and stunning glaciers. You’ll start in the Hoh Valley along reasonably level trails as you hike through one of only seven temperate rainforest ecosystems in the entire world! Plant and animal life abounds in this moss-covered wonderland, and you might even get a chance to spot one of the park’s elusive bobcats. You’ll follow the glacier-fed Hoh River during this section and camp on its shoreline as you look for the resident herd of Rosevelt Elk.
The hike will become progressively more difficult as you head upwards towards the alpine reaches, but the views never disappoint. Stunning alpine meadows grow right up to the edge of Blue Glacier – one of the largest glaciers spawning off Mount Olympus. This trek is a great option for those wanting to truly immerse themselves in the Olympic Wilderness and with this recommended itinerary, you’ll get a chance to leave your backpack behind for a day and day hike to Blue Glacier.
Recommended Itinerary
There are several ways to complete this out-and-back, Olympic Peninsula hike that involve various campsites and trails. For instance, our recommended itinerary includes am optional day hike without your backpack up to Blue Glacier on day 3. While this sight is one of the best on the trip, you could opt to hang around camp for the day and rest instead. This itinerary is meant to be a guide for you to chose which route/campsites you’d like to utilize. We’ve even included some variations as well, so you’ll know all the options!
-
Deeper Dive: Itinerary
-
DAY 1: TRAILHEAD TO OLYMPUS RANGER STATION (ALTERNATE: LEWIS MEADOW)
Hiking Distance: ~9.7 Miles
Elevation Change: Minimal – Expect a few up-and-down hills
This day is your chance to soak in the splendor of the Hoh Rainforest. The trail is very well maintained and easy to follow while the views are stunning. You’ll see absolute giants of moss-covered hemlock, spruce, and cedar soaring up towards the clouds. Keep an eye out for Rosevelt Elk – not to be found anywhere else outside of Olympic National Park.
DAY 2: OLYMPUS RANGER STATION TO ELK LAKE (ALTERNATE: GLACIER MEADOWS)
Hiking Distance: ~5.5 Miles
Elevation Change: +1675 Feet
Start the day with a little more level hiking along the Hoh River, but don’t expect it to last. You’ll soon hit a series of switchbacks, and the upwards incline will remain constant until you get to your camp. Stop at the High Hoh Bridge for lunch before reaching your destination at Elk Lake today. If you haven’t had enough sweat, however, you can keep heading up past Elk Lake towards Glacier Meadows.
DAY 3: DAY HIKE TO BLUE GLACIER
Hiking Distance: ~6 miles roundtrip
Elevation Change: +1700 Feet
Take only a day pack today and hike up a series of switchbacks until you arrive at Glacier Meadows. Just beyond here, you’ll come to a sign directing you to either the Terminal Morain or Lateral Morain. Keep to the left for the Lateral Morain and keep on for another few miles before getting those breath-taking views of snow-capped Mount Olympus and the dazzling ice of Blue Glacier. When you’ve soaked up the views, it’s time to turn around and head back to camp.
Note: Rangers often recommend leaving your hiking permit attached to your tent while you complete this day hike. We suggest taking a picture of the permit beforehand so you can produce it if asked by a ranger on the trail.
DAY 4: ELK LAKE TO FIVE MILE ISLAND (ALTERNATE: HAPPY FOUR)
Hiking Distance: ~10 Miles
Elevation Change: -1675 Feet Lost
Today can be a long day, but it is mostly downhill. Take your time, enjoy the views, and slowly make your way back down to the Hoh Rainforest and again explore its mossy wonders.
DAY 5: HIKE OUT
Hiking Distance: 5 Miles
Elevation: Minimal
A quick 5-miles hike, and you’re out!
Protip: You’ll know you’re getting close to the trailhead when clean folks with only daypacks give your smelly hiking crew a wide berth on the trail.
Details and Logistics
Now that you’ve got a grasp of what the hiking on the Hoh Valley to Blue Glacier backpacking trip looks like, it’s time to dive into some details of what this trek entails. Of course, permits and fees are part of what you will need to consider, but other logistics like how you are going to get there, where you are going to camp, and what time of year you should go should all be considered.
We’ve broken down some more of the details so you can glean some information about preparing for this hike. For a Washington backpacking trip with such phenomenal views and hiking, this trek doesn’t have too many logistics to figure out. But read on to make sure you won’t be surprised by any details you forgot to think about.
Getting there
This out and back hike begins at the Hoh Rainforest Visitor Center. The drive out here is stunning, albeit very long. Plan to get on the road very early your first day and aim to beat the crowds. You’ll undoubtedly find the Visitor Center parking lot, and nearby trails to be reasonably busy, but don’t worry! The masses will disperse as you hike deeper into the rainforest.
When to HIke
The upper reaches of this hike around Blue Glacier and Glacier Meadows campsite can be snowcovered well into June. The first snows will often start to fall in late September and October. Therefore, the best time for this hike is July and August. You’ll also have the best chance of dry and clear weather during this time. However, you can make this an early season Washington backpacking trip by only doing the day hike to Blue Glacier is the snow makes it safe. This is also a great way to avoid some of the crowds on this trip. Remember to check current weather conditions before hiking!
-
Deeper Dive: Permits, Fees, & Campsites
-
PERMITS & FEES
This backpacking trip requires an Olympic National Park backpacking permit along with a park entry fee. The permit rules are different for different sections of this hike, so we’ll discuss them separately:
HOH VALLEY (BROWN CAMPSITES ON NPS MAP)
Campsites:
-
Five Mile Island
-
Happy Four
-
Olympus Ranger Station
-
Lewis Meadow
Permits for these campsites are not reservable and are issued from the Wilderness Information Center on a first-come-first-served basis. There are plenty of tent-sites at each camp, and we’ve never had any problems finding a reasonably secluded spot for the evening.
ALPINE CAMPS (YELLOW WITH RED BORDER CAMPSITES ON NPS MAP)
Campsites:
-
Elk Lake
-
Glacier Meadows
50% of the available tent-sites at these camps are reservable. Visit the National Park Reservation System to check permit availability and submit your reservation.
WHERE TO PICK UP PERMITS
Backpacking permits are distributed from only two locations in Olympic National Park: the Port Angeles Wilderness Information Center and the Quinalt Wilderness Information Center. Contact information and addresses for both locations can be found on the National Park Website. The Quinalt center will likely be the most convenient option as it is nearest to the Hoh Rainforest and along your way if you’re coming from Olympia or Seattle. Be sure to check when they open and plan accordingly!
NATIONAL PARK ENTRY FEE
Check current Olympic National Park fees before you start your trip. If there’s even the slightest chance you’ll be visiting multiple national parks over the coming year; we highly recommend opting for the America The Beautiful Pass. This pass gives you and one other person unlimited access to federally administered national parks, forests, wildlife refuges, and grasslands.
-
Hike Hoh Valley to Blue Glacier With a Guide
Guided Hoh Valley trips are available and are a stress-free, exciting way to explore Olympic National Park. Especially if it’s your first time backpacking or your first time to Olympic, going with a guide is a great way to get your feet wet before setting out on your own. At Wildland Trekking, we offer all-inclusive trips so you can relax and enjoy your trek while we handle permits, gear, transportation, meals, and provide a professional guide!
Award Winning USA Hiking Vacations
2. The North Coast Route
The Hike
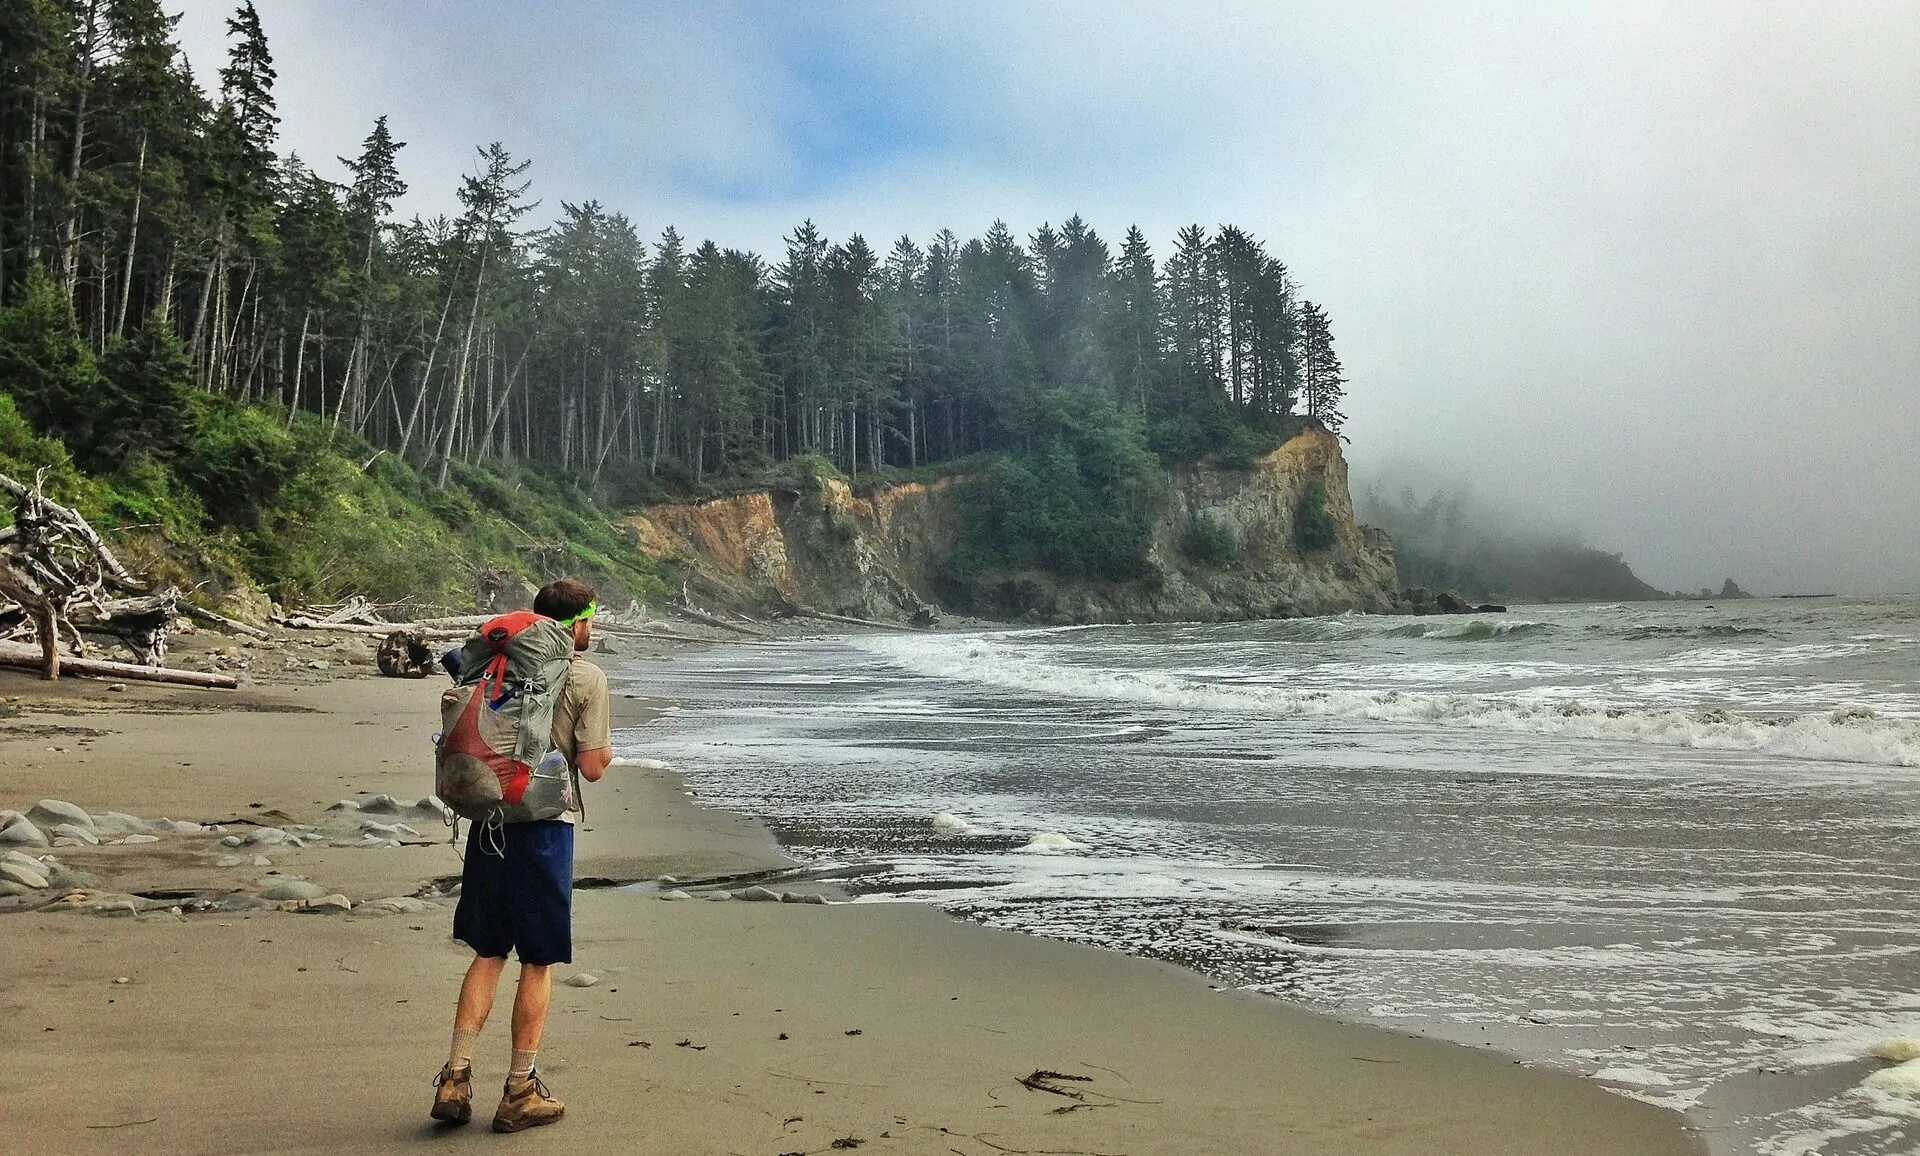
Hiking trips in Olympic National Park are not limited to mountains and forests. The stunning Olympic Coast is full of rocky headlands, mesmerizing sea life, and unforgettable sunsets. This coastline is certainly within reach via day-hiking, but a multi-day backpacking trip is the absolute best way to connect with this magical area.
This trip can be a thru-hike if you stage vehicles or an out-and-back starting from either trailhead. Regardless of the path you choose, you’ll find the days to be reasonably low-mileage, but don’t let that fool you! This stretch is a rugged piece of coast that involves scrambling over rocky tidal areas and scaling steep headlands with rope assistance in addition to enjoyable hiking along sandy beaches.
The wildlife along this coast is wonderous. Keep an eye on the water for seals, otters, porpoises, and gray whales further out. Closer to shore, you’ll see seastars, anemones, and crabs along with plenty of birdlife. Make sure you have a tide chart with you before embarking on this hike as there are several sections that are impassable at high tide. Despite the extra logistics and planning this involves, this trek is still doable for those who have never backpacked in Olympic before. However, if you’re eyeing this trip as your first backpacking trip, it might be best to join a guided group so that you get a feel for what backpacking is like.
Recommended Itinerary
Because this hike is along the coast, the itinerary is fairly simply. However, you will need to decide if you’d like to hike the trail north or south, as this will impact your parking logistics as well as some of your campsites. Our recommended itinerary begins at the northern part on the Olympic Peninsula at Shi Shi Trailhead, but you can also hike beginning in the south from the Ozette area where Ozette Lake is the most popular destination. Whichever you decide, make sure to read through each day’s itinerary to get a feel for what the trail will be like.
-
Deeper Dive: Itinerary
-
DAY 1: SHI SHI TRAILHEAD TO POINT OF ARCHES
Hiking Distance: ~4.0 to 4.5 Miles
Elevation Change: Minimal
This hike will start with an easy 2-mile walk through the forest on the Makah Native American reservation towards Shi Shi Beach. Once you reach Shi Shi, you’ll follow a steep staircase as you descend the headland down to the sandy beach. Follow the sandy crescent of Shi Shi beach southward towards Point of Arches, and look for a campsite in the treeline on your left. There are two small streams along Shi Shi beach for your water supply.
DAY 2: SHI SHI BEACH TO SEAFIELD CREEK (ALTERNATE: CAPE ALAVA)
Hiking Distance: ~2.5 to 3.0 Miles
Elevation Change: Steep Headlands +/- 100 feet
Check your tidal chart this morning, and set out from Shi Shi beach when the tide is ebbing – this will maximize your available hiking time over tidal areas and steep headland today. You’ll start on the beach just south of Point of Arches, but will soon be using the established ropes to haul yourself up and over headlands that cannot be passed any other way. Be sure to consult the National Park webpage for specific information. While you’re up on the headlands, take in the sweeping views you’ll have of the beaches below you and keep an eye open for sea otters frolicking in the waves.
DAY 3: SEAFIELD CREEK TO OZETTE TRAILHEAD VIA SAND POINT
Hiking Distance: ~9 miles
Elevation Change: Minimal
Follow the beautiful sandy beach south from Seafield Creek. There is a trail here at Cape Alava that can take you straight to the Ozette trailhead and cut out a little extra mileage, but you’ll miss the petroglyphs that can be found at the southern base of an optional headland trail at the area known as Wedding Rocks.
Sand Point is a little south of Wedding Rocks. Look for a trail on your left when you reach this point, and take it to reach the Ozette trailhead.
ITINERARY VARIATIONS
If staging cars is not an option, you can complete a day hike to Cape Alava or Sandpoint before returning to Seafield creek for a second night (your third night of the trip). Then return to Shi Shi beach the next day. The North Coast Route can also be hiked in the opposite direction, starting at the Ozette trailhead and Ozette lake and heading north towards Shi Shi Beach.
Details and Logistics
With a proposed itinerary set, it’s time to look into some of the various details and logistics that are involved in this beach camping, backpacking trip. With the trip only being 3 days in length, your logistics might be trickier than you’d expect. This trail is point-to-point, meaning that you will need to park a car at each end of the trail or hike in and back instead of all the way through. The tides also play an important roles in this trip as there are a few areas that are impassable at high tide.
We’ve broken down some of the more detailed logistics that hikers should be aware of before embarking on this trip. You can also do more research of your own if you’d like more information. The National Park Service website is a great resource where you can gather details and monitor conditions.
Getting there
Our recommended itinerary begins at the Shi Shi Trailhead located just outside of Neah Bay. This trailhead is very near the most northwestern point in the United States and is a significant drive from the main cities of Seattle and Olympia. We recommend starting in Port Angeles to cut out some driving time on your first day. The Olympic Wilderness Information Center, where you’ll pick up your permit, is also located in Port Angeles.
The other entry or exit point to this hike is the Ozette Trailhead.
WHen to Hike
This area of the park typically sees minimal snow but can be very cold and wet during the winter months. The best time to complete this hike is May through October. Remember, the weather on this section of the coast can be very unpredictable, and morning mists and drizzles are commonplace.
TIDAL INFORMATION
Be sure to consult the park ranger about tides when you pick up your backpacking pass. You can only cross several sections of this hike at mid or low tide, and the park ranger will provide with you a tide chart to plan your hiking schedule.
-
Deeper Dive: Permits & Fees
-
This backpacking trip requires an Olympic National Park backpacking permit. If you are parking at the Shi Shi Trailhead area, you will need a Makah Recreation Permit. If you are parking at the Ozette Trailhead, you will need a National Park Pass.
BACKPACKING PERMIT
All campsites on this backpacking trip can be reserved ahead of time. The campsites nearest to the trailheads can be very busy during the summer months, and some campsites on this trip are very small, so we recommend reserving ahead of time. You will pick up your permit from the Port Angeles Wilderness Information Center.
The first part of this hike towards Shi Shi is on Makah land, and you will need to pick up a recreation pass as you drive through Neah Bay. Take note, parking at the Shi Shi trailhead is limited to day-hikers only. You will pass several private parking lots on the road to the trailhead offering overnight parking for a fee.
NATIONAL PARK PASS
Parking at the Ozette Trailhead requires a National Park pass valid for the whole duration of your hike. You can purchase a pass when you pick up your permit at the Port Angeles Wilderness Information Center.
HIKE THE NORTH COAST WITH A GUIDE
Because of the extra logistics of planning your hike around the tides, joining a guided trip along the wilderness coast in Olympic is a great option to reduce your stress level and allow you to more freely enjoy the trip. At Wildland Trekking, we offer all-inclusive trips where your guide will take care of permits, gear, transportation, meals, and all the details of planning. You can check out our Guided North Coast trips for more information.
3. Enchanted Valley

The Hike
This Olympic National Park trip certainly lives up to its name and is nothing less than enchanting. Enjoy hiking through the scenic Quinalt Rain Forest – the same temperate rainforest ecosystem as the Hoh – before emerging in the awe-inspiring enchanted valley.
Dozens of small waterfalls dot the valley walls as they plunge towards the Quinalt River, on whose shores you will camp. A nearly century-old chalet also adds it’s indomitable quality to the area, making it a magical experience.
Recommended Itinerary
Our recommended itinerary here is fairly straightforward, a simple in and back trail. But there are a variety of different trails in the area that you can choose to explore, including the trail to the famous Anderson Glacier. Alternatively, you can choose to rest at camp for a day and explore more of Enchanted Valley. We detail more itinerary options and variations below, but our recommended itinerary is a great place to start from, even if you intend to expand it.
-
Deeper Dive: ITINERARY
-
DAY 1: GRAVES CREEK TRAILHEAD TO O’NEIL CREEK
Hiking Distance: ~6.7 Miles
Elevation Change: 600 Feet – Plenty of up-and-down hills
Hike up the trail towards Pony Bridge and then cross to the opposite side, admiring the dazzlingly blue Quinalt River below. You’ll continue following the river for the rest of the day as you hike through fantastic old-growth forest with plenty of opportunities for animal sightings.
Your campsite at O’Neil Creek is right on the shores of the river, and you can take a dip if you want to brave the cold.
DAY 2: O’NEIL CREEK TO ENCHANTED VALLEY
Hiking Distance: 6.5 Miles
Elevation Change: 700 Feet
Continue to make your way through the Quinalt Rainforest. you cross a narrow bridge back over the Quinalt River and emerge into Enchanted Valley itself.
The steep walls of the valley rise almost vertically for hundreds of feet. Snowfields lost in the clouds above spawn dozens of creeks that come cascading back down the sides of the valley for a truly enchanting aura.
DAY 3: ENCHANTED VALLEY TO GRAVES CREEK TRAILHEAD (ALTERNATE: O’NEIL CREEK)
Hiking Distance: 6.5 miles
Elevation Change: 700 Feet
Early this morning, pack up your gear and head back into the forest. Your hike today is a mirror image of the day before as you head back towards O’Neil Creek. You can hike the whole distance to the trailhead today if you’d like, but 13 is quite a long haul.
DAY 4: O’NEIL CREEK TO GRAVES CREEK TRAILHEAD
Hiking Distance: 6.7 miles
Elevation Change: 600 Feet
Make an early start, and you’ll be back to your vehicle before noon today. Depending on the season, you may pass a horde of thimbleberries beginning about half a mile before Pony Bridge.
ITINERARY VARIATIONS
There are a few variations on this itinerary that can make your trip more or less strenuous as you please. One is to take a rest day in Enchanted Valley to further enjoy the scenery without the pressure of packing up. There is a plethora of waterfalls in the area to explore as well as much wildlife to see. You could take a rest day on day 3 and then hike out of the valley on days 4 and 5, extending the above itinerary by 1 day.
Another alternative would be to extend your trip by following the Quinault River, departing Enchanted Valley from the northeast, and climbing up to Anderson Glacier. Be warned, however, the trail to Anderson Glacier climbs 3400 ft of elevation in about 7 miles, so it is no easy trek.
Details and Logistics
Much like the other trips in this top 3 Olympic backpacking trio, Enchanted Valley comes with its fair share of details to work out, although arguably less than our other two proposed trips. When to visit Enchanted Valley is probably your biggest decision as this more of an early season backpacking trip than the other two, due to the lower elevation and lack of snow on the ground in spring.
Of all the Olympic National Park hikes and backpacking trips, this is a favorite of many, so you’ll probably want to be prepared for crowds and for permits to be competitive. If you’d rather not have to deal with the hassle of getting permits and planning campsites, you can book a guided trip with Wildland Trekking and let us take care of all the pesky logistics.
GETTING THERE
This Olympic National Park hike begins at the Graves Creek Trailhead, only 2.5 hours from Olympia, WA.
WHen to hike
The cascading falls that make Enchanted Valley so enchanting flow from spring to mid-summer. Because of this, the best time for this adventure is May to late July. It is still an enjoyable hike August and Septemeber, but don’t assume all the waterfalls will be flowing. Fall and winter are, more or less, out of the question as this valley still receives lots of snow, making traditional backpacking impossible.
-
Deeper Dive: Permits & Fees
-
The Enchanted Valley Hike requires both a backpacking permit and a national park pass.
BACKPACKING PERMIT
Reservations are not accepted for any campsites along the Enchanted Valley hike. This means that backpacking permits are issued on a first-come-first-served basis only. All the more reason to roll out of bed at a reasonable hour on that first day. You’ll pick up your permit at the Quinalt Wilderness Information Center, which is on your way to the trailhead.
NATIONAL PARK FEE
Don’t forget that you’ll need to pay a fee to park your car at the trailhead. This fee can be paid at the same time as your camping permit at the Quinalt Wilderness Information Center.
HIKE ENCHANTED VALLEY WITH A GUIDE
Guided Enchanted Valley trips are available and are a stress-free, exciting way to explore Olympic National Park. Let us handle permits, gear, transportation, meals, and provide a professional guide so you can focus 100% on enjoying your adventure.
Backpacking Logistics
It’s always important to be prepared for any trip you embark on, and while we have covered many of the specific details for these Olympic National Park hikes, there are a few general backpacking logistics we haven’t mentioned that are essential to have an enjoyable and safe backpacking trip.
- Maps: Please don’t forget to always have a good map of your backpacking area. The National Park Wilderness Trip Planner Map will help you prep your itinerary, but you should have a hardcopy for the trail.
- Packing: Pack smart! Consult our post on packing for a hiking trip to make sure you have all the essentials. If you join us for a guided adventure in Olympic National Park, be sure to review our recommended clothing and gear list for Washington State.
- Bear Safety: Olympic National Park, as well as the entire Olympic Peninsula and many other backpacking destinations, are bear country. Whether black or brown bears are present, always appreciate that you’re hiking into the animal’s territory. Practice proper bear safety and review our tips to hiking in bear country. Check with park rangers before starting your hike to stay up to date on bear activity and camping regulations.
Alternative Guided Trips
All three of these Washington Backpacking trips represent the best of the best that there is in Olympic and early season backpacking, but they are all at least moderately challenging and require a fair bit of advanced planning.
At Wildland Trekking, we strive to give every guest the outdoor experience they desire along with allowing them to stay within their limits. If you’re looking to try out backpacking but aren’t ready to jump into a moderately difficult or longer trip, we offer a great trip to Point of Arches in Olympic National Park that is an excellent alternative for families and beginners. Beginning at the very tip of the Olympic Peninsula, this trip is an easy, 3 day trek that shows you the best of the Olympic Coast as well as the many tide pools and sections of pristine coastal forest. Our trips are all inclusive, so meals, transportation, gear, and a professional guide are all included. We hope to see you on one of our trips soon to share in the amazing experiences the outdoors can bring to all of us.
Award Winning USA Hiking Vacations

