
Best Three Mount Rainier Day Hikes
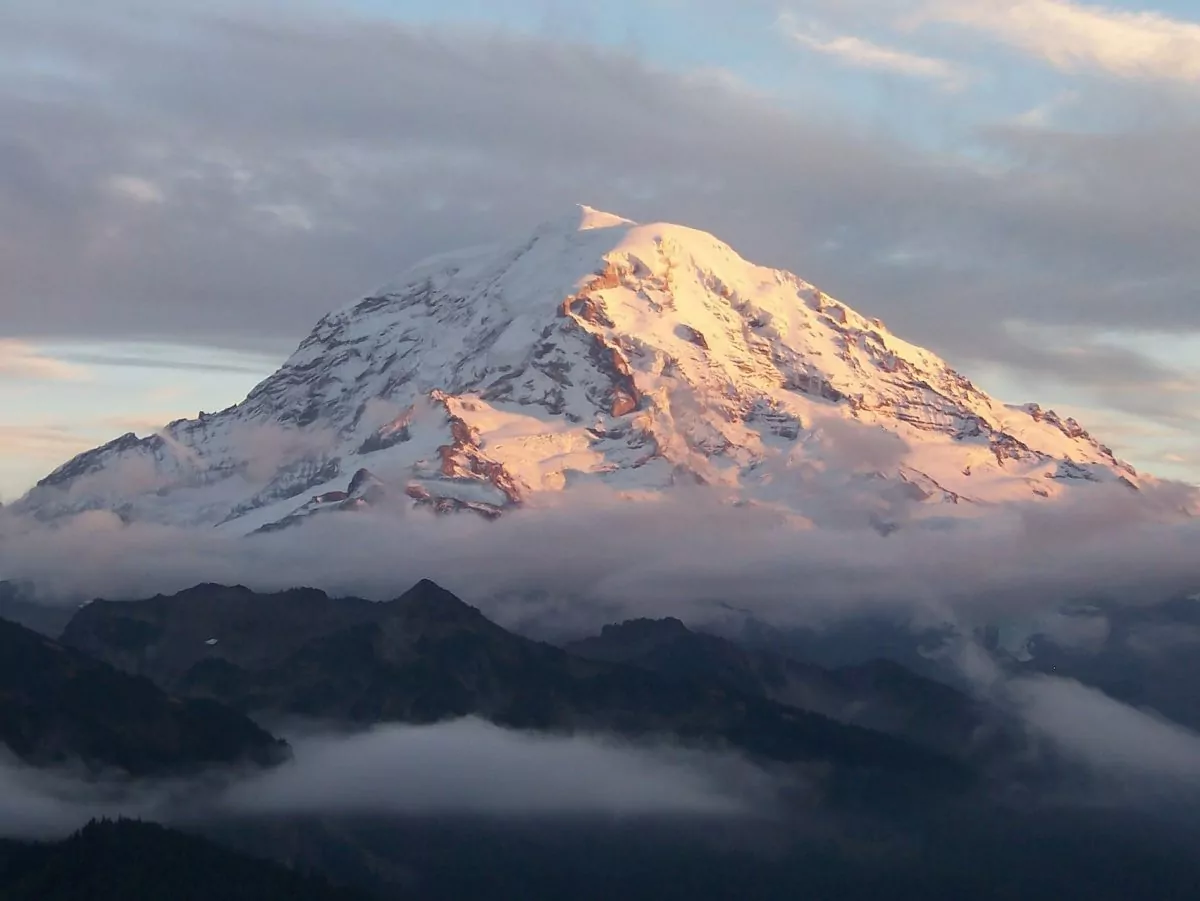
Mount Rainier is often considered the crown jewel of Washington’s outdoor adventures. On a clear day, the mountain is visible from most of the Puget Sound area, from the Olympic Mountains to the north of Seattle, and towers over the surrounding Cascade Mountains. It’s frosty and glistening peak is an icon for the region, and draws adventure enthusiasts from all over the country, and the world. From mountaineers to snowboarders to backpackers, this 14,411-foot mountain has something for everyone.
But if you only have a day to visit, there are still plenty of opportunities to explore this beautiful mountain, and that’s why I’m here! After guiding in the Pacific Northwest region with Wildland Trekking for several seasons, I have definite favorites when it comes to the plethora of hiking options on Mount Rainier. So to make sure you see the very best this mountain has to offer, I’ve compiled my top three Mount Rainier day hikes right here for your perusal.
Before we dive into the trips, a quick word of warning; Mount Rainier is famous in this region for a temperamental and fickle mood when it comes to weather. So, regardless of how the day looks when you start, please remember to always bring layers and a raincoat – just in case. Trust me; nothing ruins a day hike more than being caught out in the elements unprepared!
Now then, let’s take a look at the best three Mount Rainier day hikes, and get your adventure started!
| Trip | Difficulty | Miles |
| Camp Muir | Strenuous | 8.0 |
| Burroughs Mountain | Easy-Moderate | 9.0 |
| Summerland Trail | Moderate | 8.4 |
All-inclusive Mount Rainier Hiking Packages
1. Camp Muir
Overview
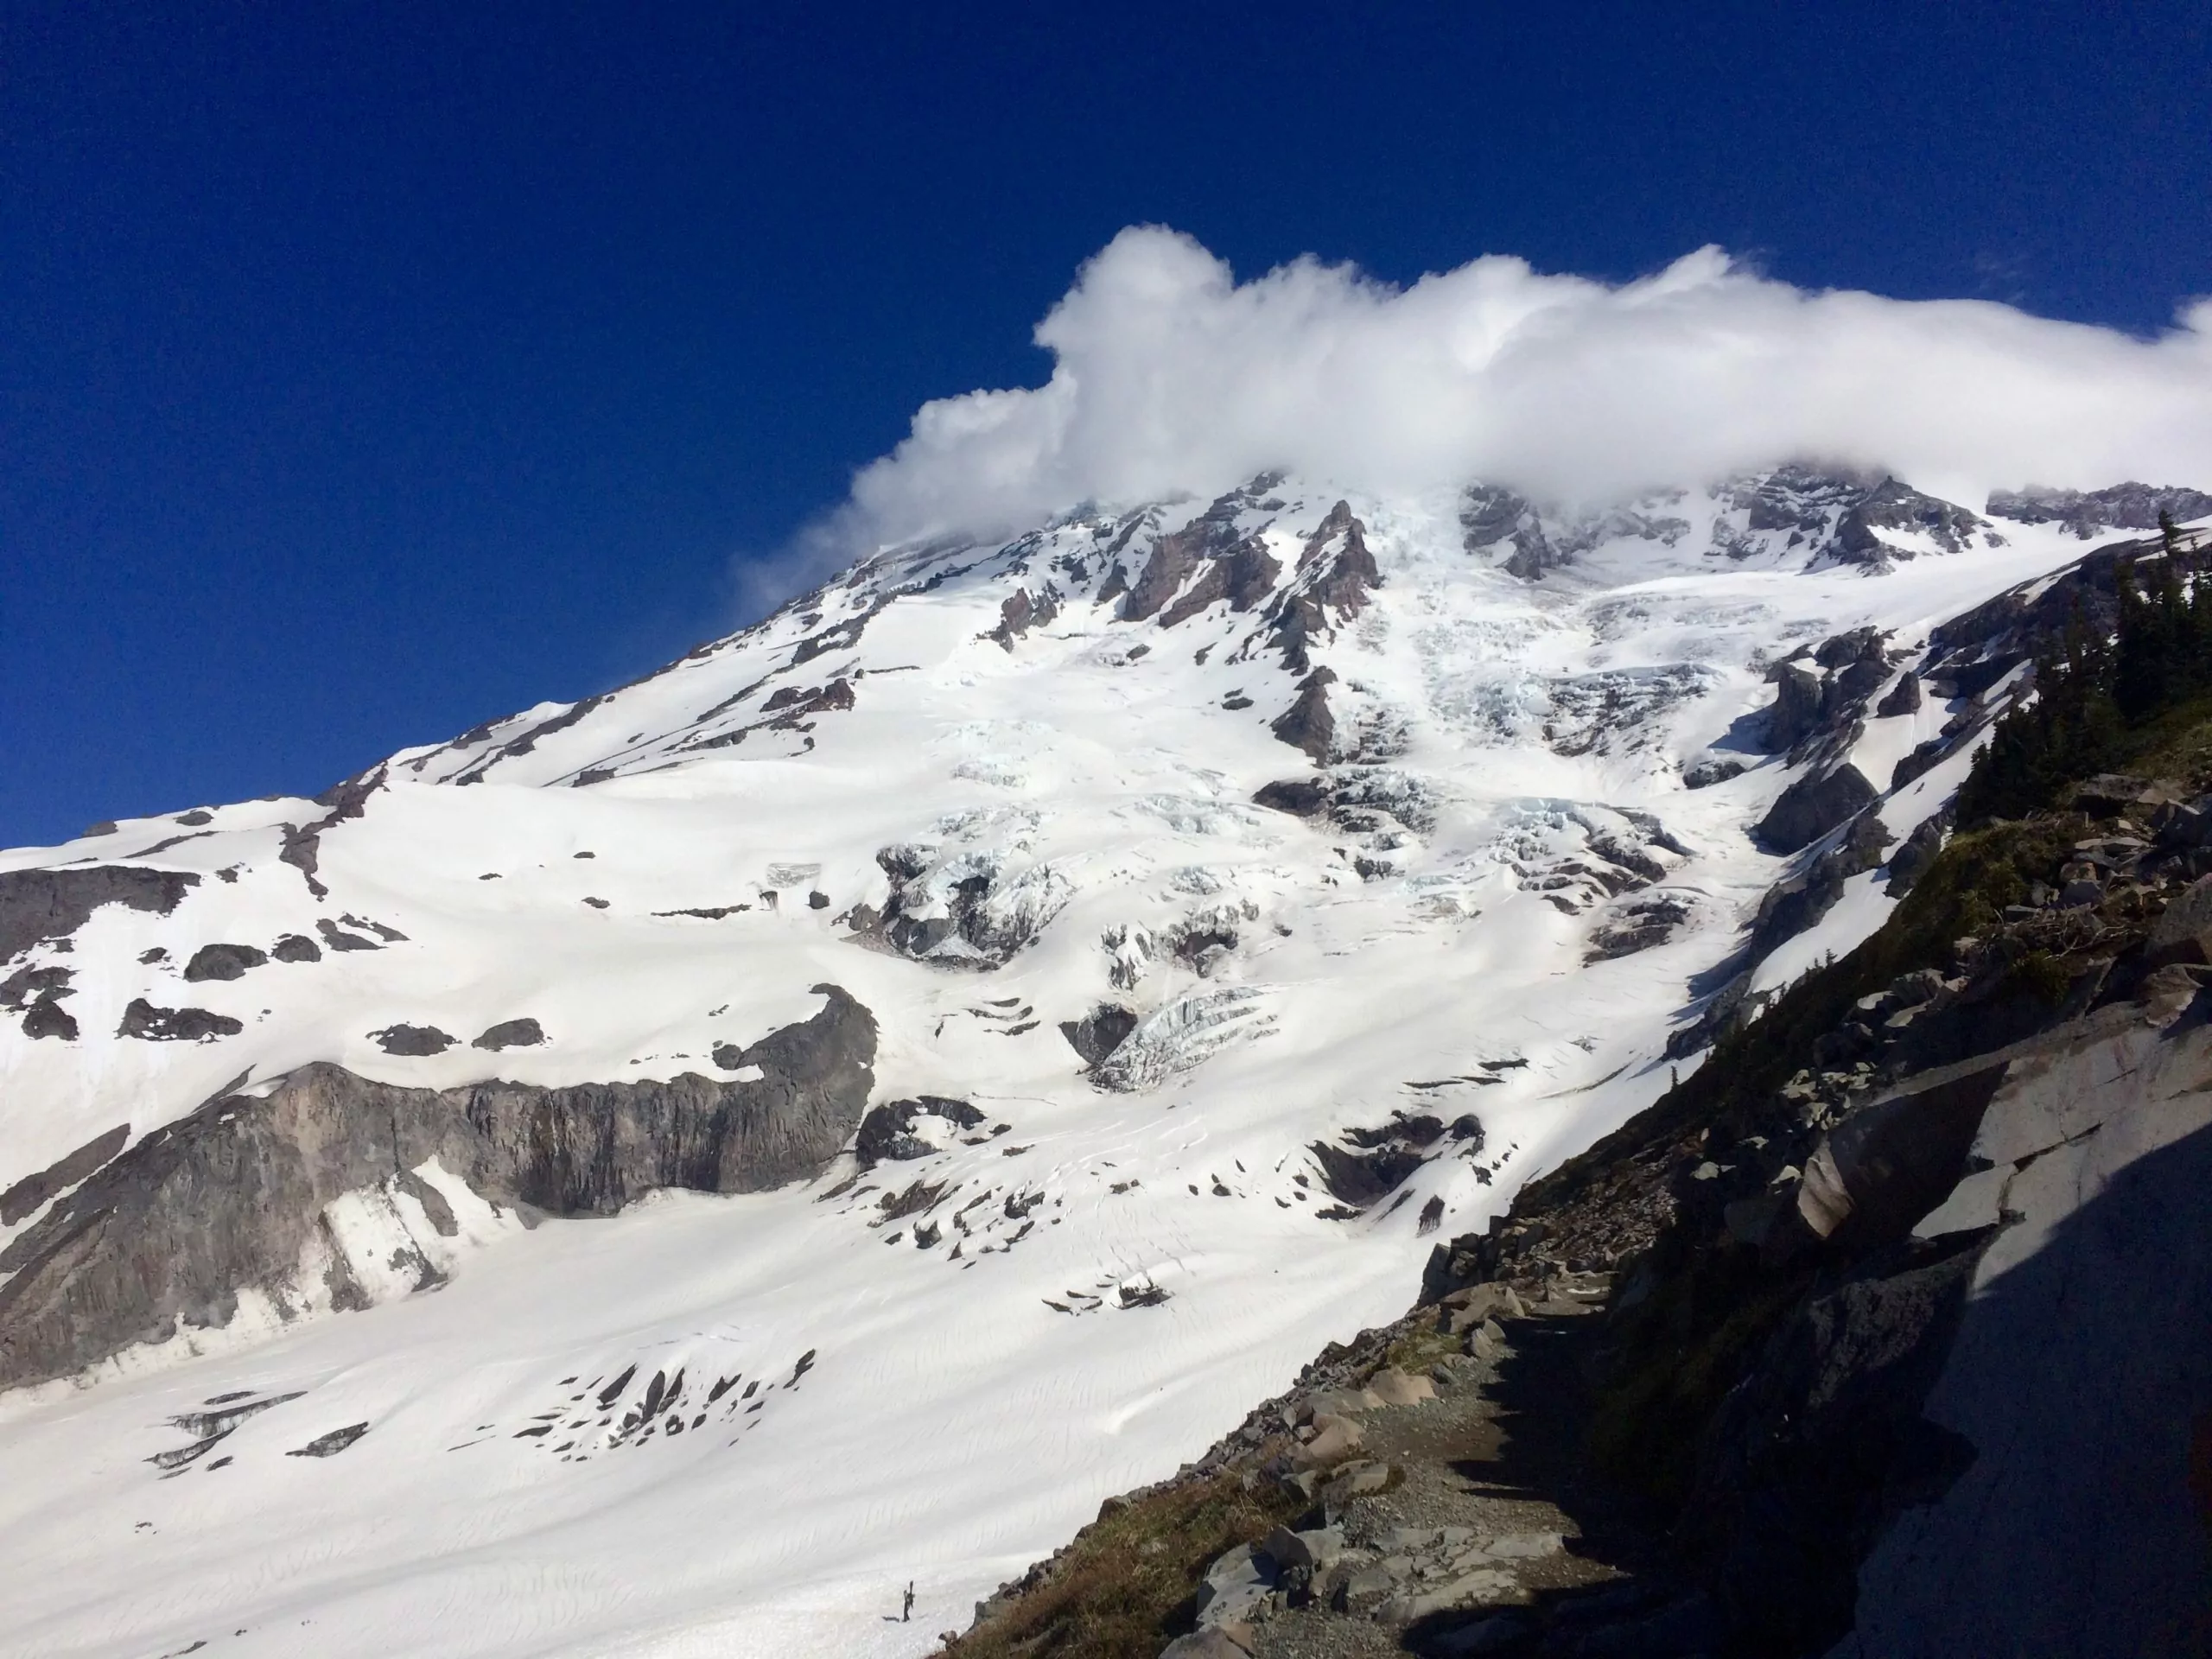
Hard work for gorgeous views can be the Camp Muir trail moto. Although it’s only four miles to your destination, don’t let that number fool you. Every step of those four miles will be up, and up, and up. In fact, you’ll be climbing about 1,000 feet per mile, which is no easy task! However, the views from Camp Muir – the basecamp for summit attempts – are absolutely stellar. The entire Cascade Mountain range will be below you, and you may spot Mount Adams and Mount St. Helens in the distance. Turn the other direction, and you’ll have unobstructed views of Rainier’s towering magnificence, crisp-blue glaciers, and near-endless snowfields.
My most important piece of advice for this hike is pacing. Remember, you’ll be climbing up about 1,000 feet per mile, most of which will be in deep snow. Therefore, take your time, find a pace that works for you, and you’ll get there!
Trail Details
Trailhead: Paradise Visitor Center
Hike Type: Out and back
Mileage: 8 roundtrip — 4 miles up and 4 back down
Elevation Change: +4,500 Feet
Highest Point: 10,080 Feet
Trail Condition: Part established dirt trail and part well-trafficked snowfield
Bathroom Facilities: At the trailhead, Panorama Point, and Camp Muir
Starting Point: Paradise Visitor Center
The Paradise Visitor Center is one of the main car-accessible viewpoints for Mount Rainer. Located at 5,400 feet, this is the primary jumping-off point for summit attempts, Camp Muir day hikes, and a plethora of shorter and easier strolls around beautiful alpine meadows. The visitor center is best reached via the Park’s Nisqually Entrance, located just past Ashford, WA, on highway 706.
This is probably the most popular destination for all of Mount Rainier National Park, and the parking lot will start to fill up around 10 am on nice days. So, plan ahead and arrive early, if you can. However, there is additional overflow parking located about 0.25 miles before the visitor center itself. If traffic is looking busy, I recommend you pull straight into this parking lot on arrival instead of winding your way through the main visitor center parking lot looking for a spot.
As for the trail itself, you’ll find plenty of signage beginning at the parking lot directing you to Panorama Point – a prominent lookout on the way to Camp Muir. Follow these signs to get your hike started.
The Trail
During the warm summer season, the first half of your hike will be on well-maintained and highly-trafficked dirt trails, but you may encounter occasional small snow sections to cross. You’ll be following signs for Panorama Point during this first half, and you’ll most likely just have to follow the crowds as this is an extraordinarily popular hike.
A portion of the crowds will break off upon reaching Panorama Point, but not you! At this point, you’ll encounter the Muir Snowfield. Following your navigation tool (discussed below) or the almost inevitable well-worn footprints in the snow, you’ll begin your tough climb up to Camp Muir.
This portion is tough! Progress is slower in the snow, and it seems to take infinitely more effort to make headway – but you’ll get there. Additionally, you’ll likely spot Camp Muir long before you reach it, and my best advice is to look away! Constantly watching this far off target will only make the hike seem longer, so focus on the immediate scenery, keep pushing, and you’ll get there! Along the way, remember to take breaks for water and snacks while taking in the sweeping views of the Cascade Mountain Range below you.
Once you’ve taken your share of pictures at Camp Muir and admired the icy magnificence of Mount Rainier, it’s time to head back down to the Paradise Visitor Center the same way you came up. If the snow is deep enough, you can consider glissading down on your rear-end for part of the descent. However, please be very careful, go only for short distances at a time, and remember that slow speeds are much easier to control. Don’t attempt to glissade if you’re wearing shorts!
Appropriate Gear
I cannot over-emphasize the importance of proper gear and preparation for this hike. Please remember to bring the following items – keeping in mind that the weather on Rainier can jump from a clear warm day to a freezing snowstorm in the blink of an eye.
Navigation: Please bring an accurate topographical map, and know how to use it. Two very dangerous glaciers flank the Muir Snowfield, and it’s easy to become disoriented if whiteout conditions suddenly appear. Alternatively, consider some form of electronic/GPS navigation for this same reason. Please don’t underestimate how disorienting a sudden change in weather can be, or the danger of inadvertently wandering onto a glacier. Therefore, be prepared, and you’ll enjoy your hike all the more!
Layers: While light and breathable clothing may be perfect for the tough hike up, remember that you’re at almost 10,000ft elevation! Chilly air will cool you off almost as soon as you stop moving, and this will be compounded on a cloudy day. So please pack extra layers along with a raincoat.
Food: This can easily turn into an all-day (6+ hours) hike. Add to this the altitude and strenuous activity level, and you should appreciate the need for snacks along the way. Bring plenty of energy-rich food for the hike up, and a dense lunch or snack to have at Camp Muir before heading down.
Traction: While going up the Muir Snowfield is relatively straightforward, coming down without faceplanting in the slippery snow is much more complicated. Therefore, bring along some extra traction for your boots in the form of microspikes or any other traction device that you can easily fasten to your shoes.
Permits and Fees
Mount Rainier requires an entrance fee of $30 per vehicle. However, if you plan on visiting National Parks often, the America the Beautiful National Park Pass will also cover your entrance and is a much more economical option in the long run if you use it often.
When to Hike
Late June through September provides ample opportunity to explore Camp Muir. Keep in mind that the entire trail, beginning at the Paradise parking lot, will likely be snow-bound in June and into July. As summer progresses, the snow will slowly recede to expose more and more of the dirt trail. Remember to keep a close eye on the area’s weather, as well as trail conditions.
Hike Mount Rainier with A Guide
Wildland Trekking offers independent day hikes to Camp Muir, and we also explore the same trail and snowfield as part of our stunning Mount Rainier camping-based tours and Inn-Based Tours. Let our professional and knowledgeable guides handle gear, snacks, logistics, and meals, so you can focus 100% on enjoying your adventure. Read more…
Award-Winning Pacific Northwest Hiking Adventures
2. Burroughs Mountain
Overview
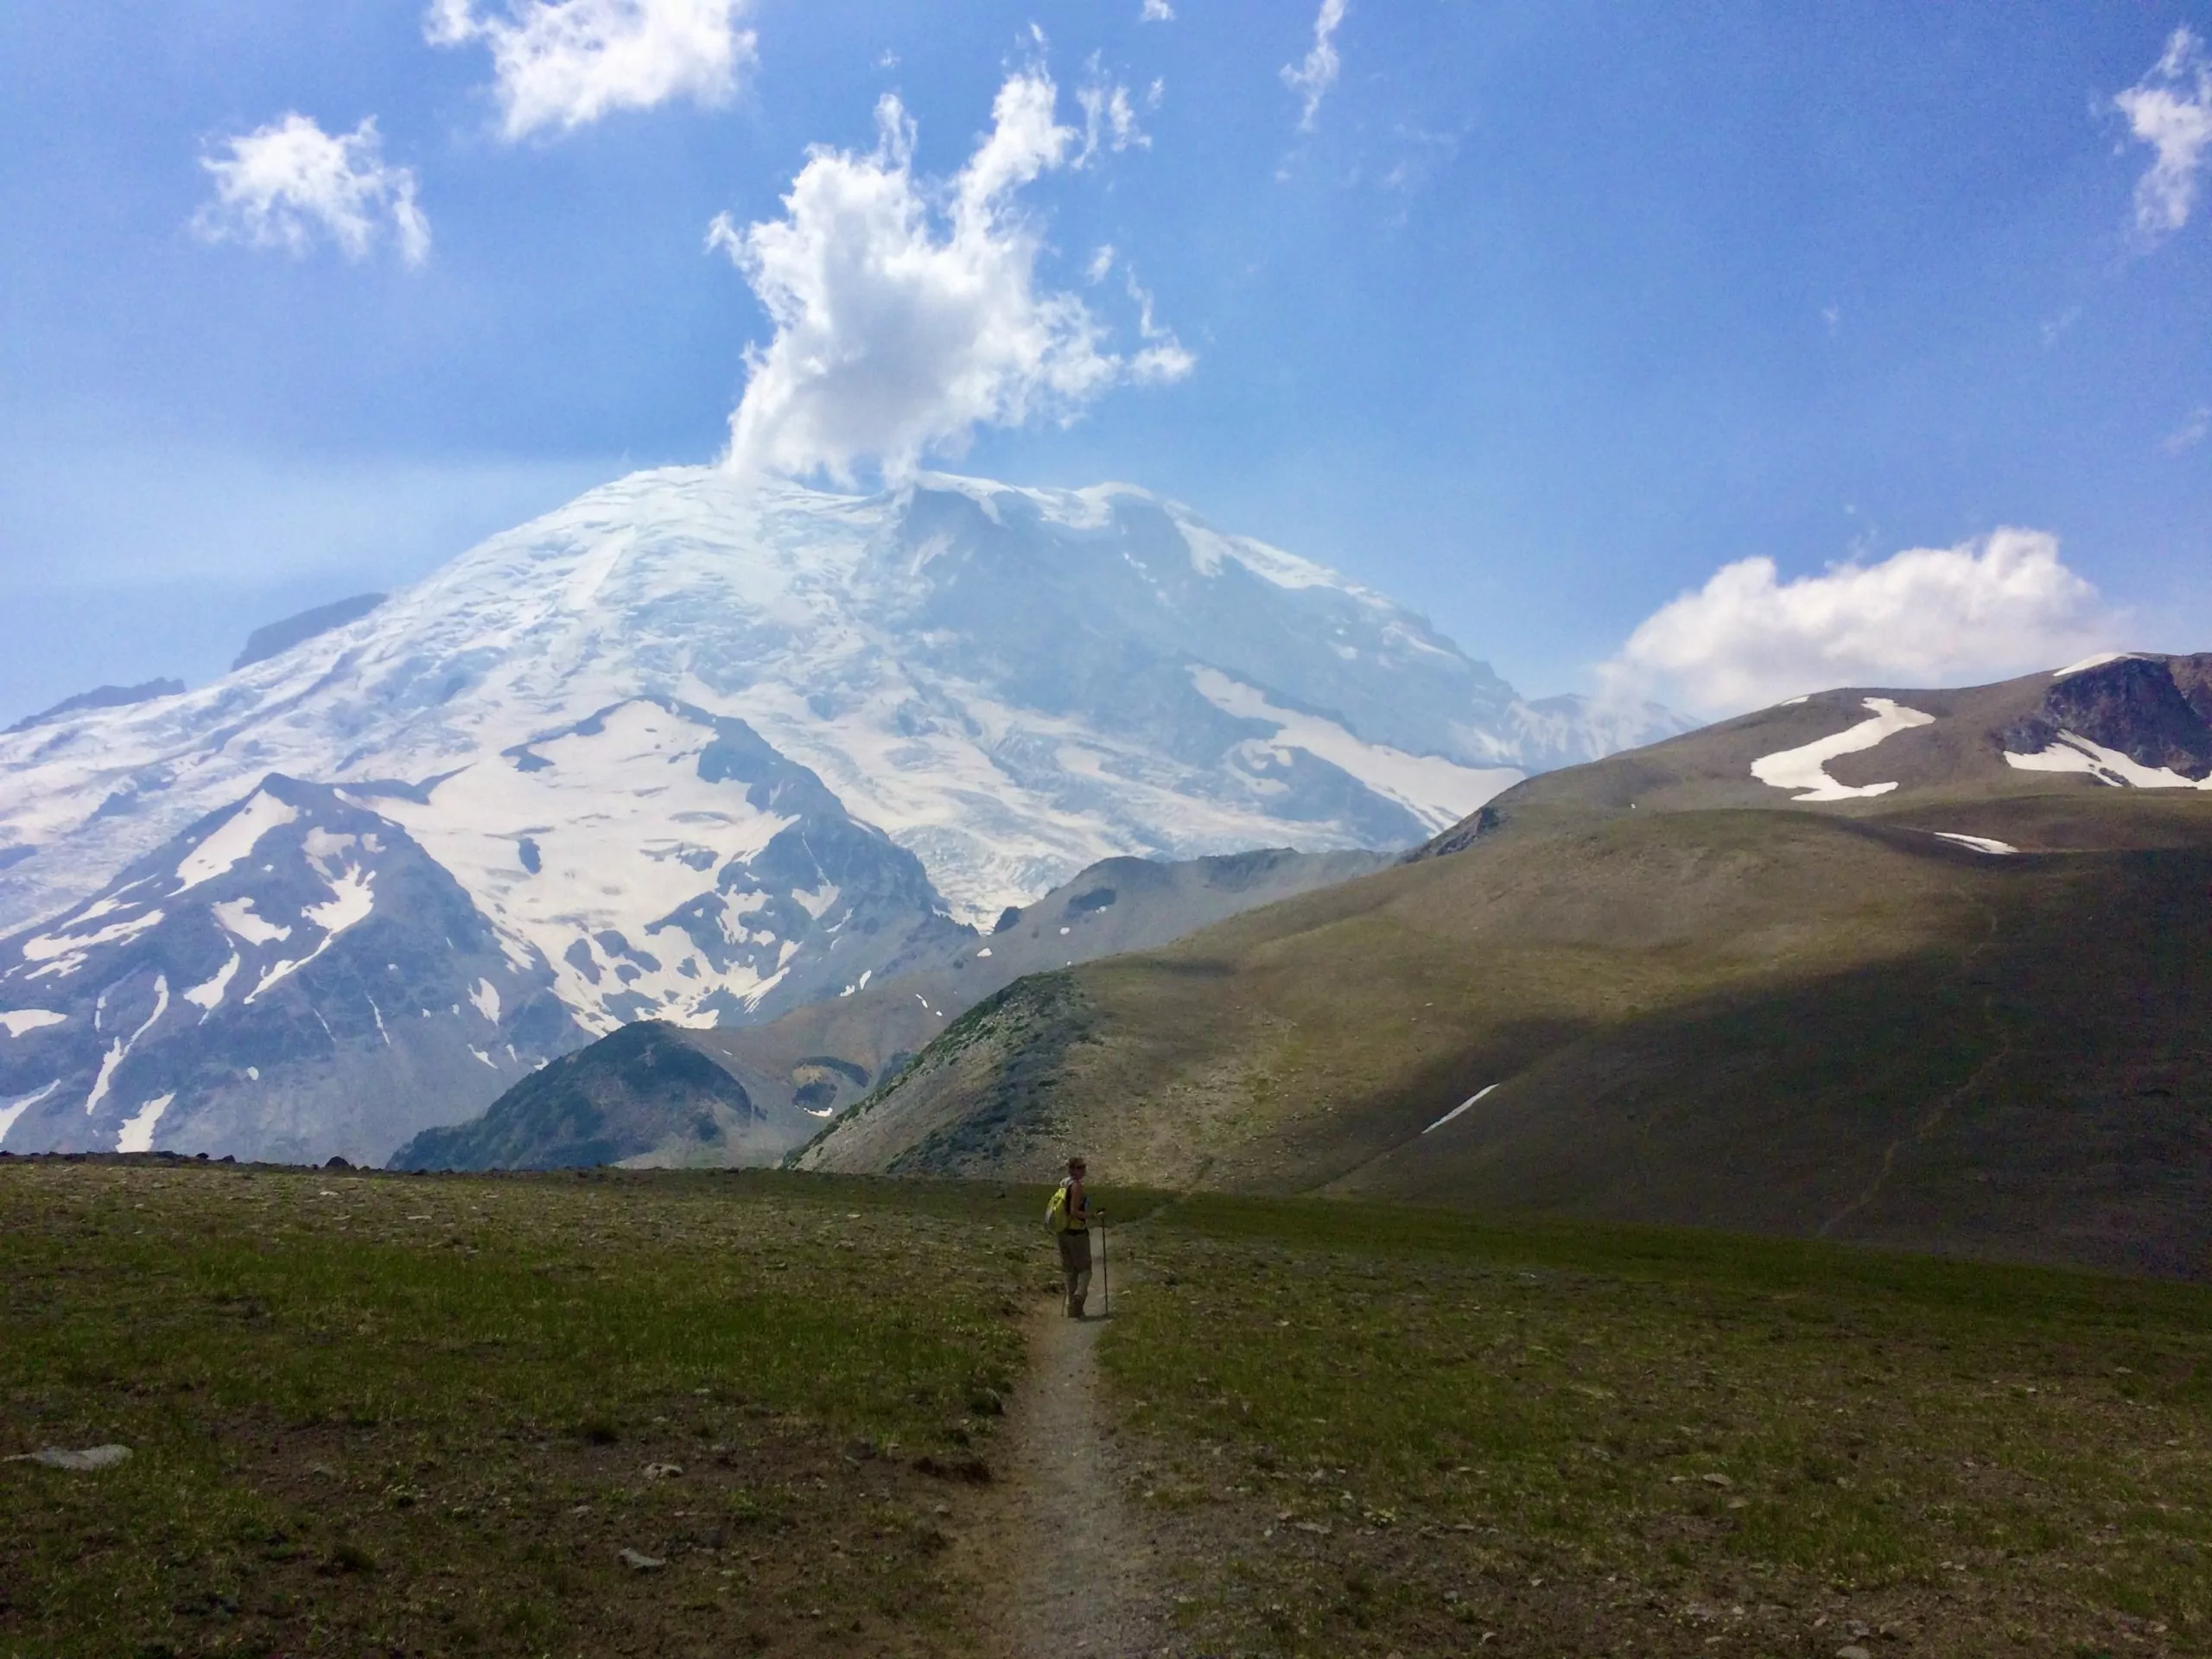
On the opposite side of Mount Rainier from Camp Muir, we have the Burroughs Mountain Trail. While you won’t quite be hiking as close to Rainier’s snowpack and glaciers, Burroughs Mountain nevertheless provides unobstructed jaw-dropping views of Rainier’s icy glory, along with incredible views of the massive Winthrop Glacier.
I’m particularly fond of the Burroughs Mountain hike due to its scalability. There are three Burroughs Mountain lookouts, gradually increasing in difficulty the further you go. Therefore, this is an ideal hike for families and experienced hikers alike! Just remember, there is almost no cover or water along this trail, so plan accordingly and bring plenty of sunscreen and drinks!
Trail Details
Trailhead: Sunrise Parking Lot
Hike Type: Out and Back
Mileage: 9 Miles Roundtrip – Hiking Out to Third Burroughs
Elevation Change: +2,500 Feet
Highest Point: 7,800 Feet
Trail Condition: Dusty and Well-Maintained Dirt Trail
Bathroom Facilities: At Trailhead
Starting Point: Sunrise Parking Lot
On the northeast side of Mount Rainer, Highway 410 snakes along the White River, providing fantastic views of the lush Cascade Mountains along the way. A few miles past the Crystal Mountain Ski Resort – a favorite among winter sports enthusiasts – you’ll find a turn for the Sunrise Park Road. Continue following signs for this road, and the Sunrise Visitor Center, and you’ll snake your way up a series of switchbacks before finding yourself at the parking lot.
This is a very popular location, and I recommend starting your trip early so you have no trouble finding parking.
The Trail
Start by following signs for the Sourdough Trail, and head west on this trail. The trailhead is in the northwest corner of the parking lot. After perhaps a mile of hiking along the pretty Sourdough Ridge, you’ll come to a trail junction near the fenced-off Frozen Lake – the primary water source for the businesses at Sunrise. Here, you’ll turn southwest directly toward Mount Rainier, and follow the signs for Burroughs Mountain.
After about another mile, you’ll arrive on top of First Burroughs. Your views of Rainier and the surrounding mountains will be completely unobstructed, thanks to the lack of any noticeable vegetation on rock-ridden Burroughs. However, you’re still only partway through your journey, and you’ll likely still be surrounded by a crowd of day-trippers from the parking lot.
Continue along the trail towards Rainier, and you’ll descend slightly from First Burroughs before ascending Second Burroughs at about 7,400 feet. The route to Second Burroughs is just over half a mile, and you’ll notice the crowds begin to dwindle at this point. Additionally, your closer vantage point to Mount Rainier will provide crystal clear views of the shimmering ice sheets, glaciers, and snowpack that make the volcano stand out so dramatically.
If you have the time and energy, Third Burroughs – about 1.2 miles further – provides the absolute best views as you’ll be directly above the Winthrop Glacier, which has been mostly hidden up to this point. Once you’ve taken in the views and had a snack, it’s time to turn around and head back the way you came.
Permits and Fees
Like Camp Muir, this Mount Rainier day hike requires an entrance fee of $30 per vehicle. Again, I highly recommend the America the Beautiful National Park Pass if you have any intention of visiting any more national parks during the coming year.
When to Hike
Late June through September provides the best opportunity to explore Burroughs Mountain. There may be a few snow patches to cross earlier in the season, but most of these will melt away by mid-July. Keep in mind that the lack of vegetation that provides such incredible views also means no shade on sunny days. So bring plenty of water and sun protection! Additionally, it’s always a good idea to check the weather and trail conditions before heading out.
Hike Mount Rainier with A Guide
Wildland Trekking offers Burroughs Mountain as a standalone day hike, but that’s not all! Our Mount Rainier Inn-Based Tours visit this beautiful trail on our last day. Let our professional and knowledgeable guides handle gear, snacks, logistics, and meals, so you can focus 100% on enjoying your adventure. Read more…
3. Summerland Trail
Overview
Many veterans of Rainier’s famous Wonderland Trail – a several-day backpacking trip that circles the mountain – point to the Summerland portion of the trail and claim that some of the best views in the entire park can be found right here. Once you complete the Summerland Trail for yourself, you’re bound to agree!
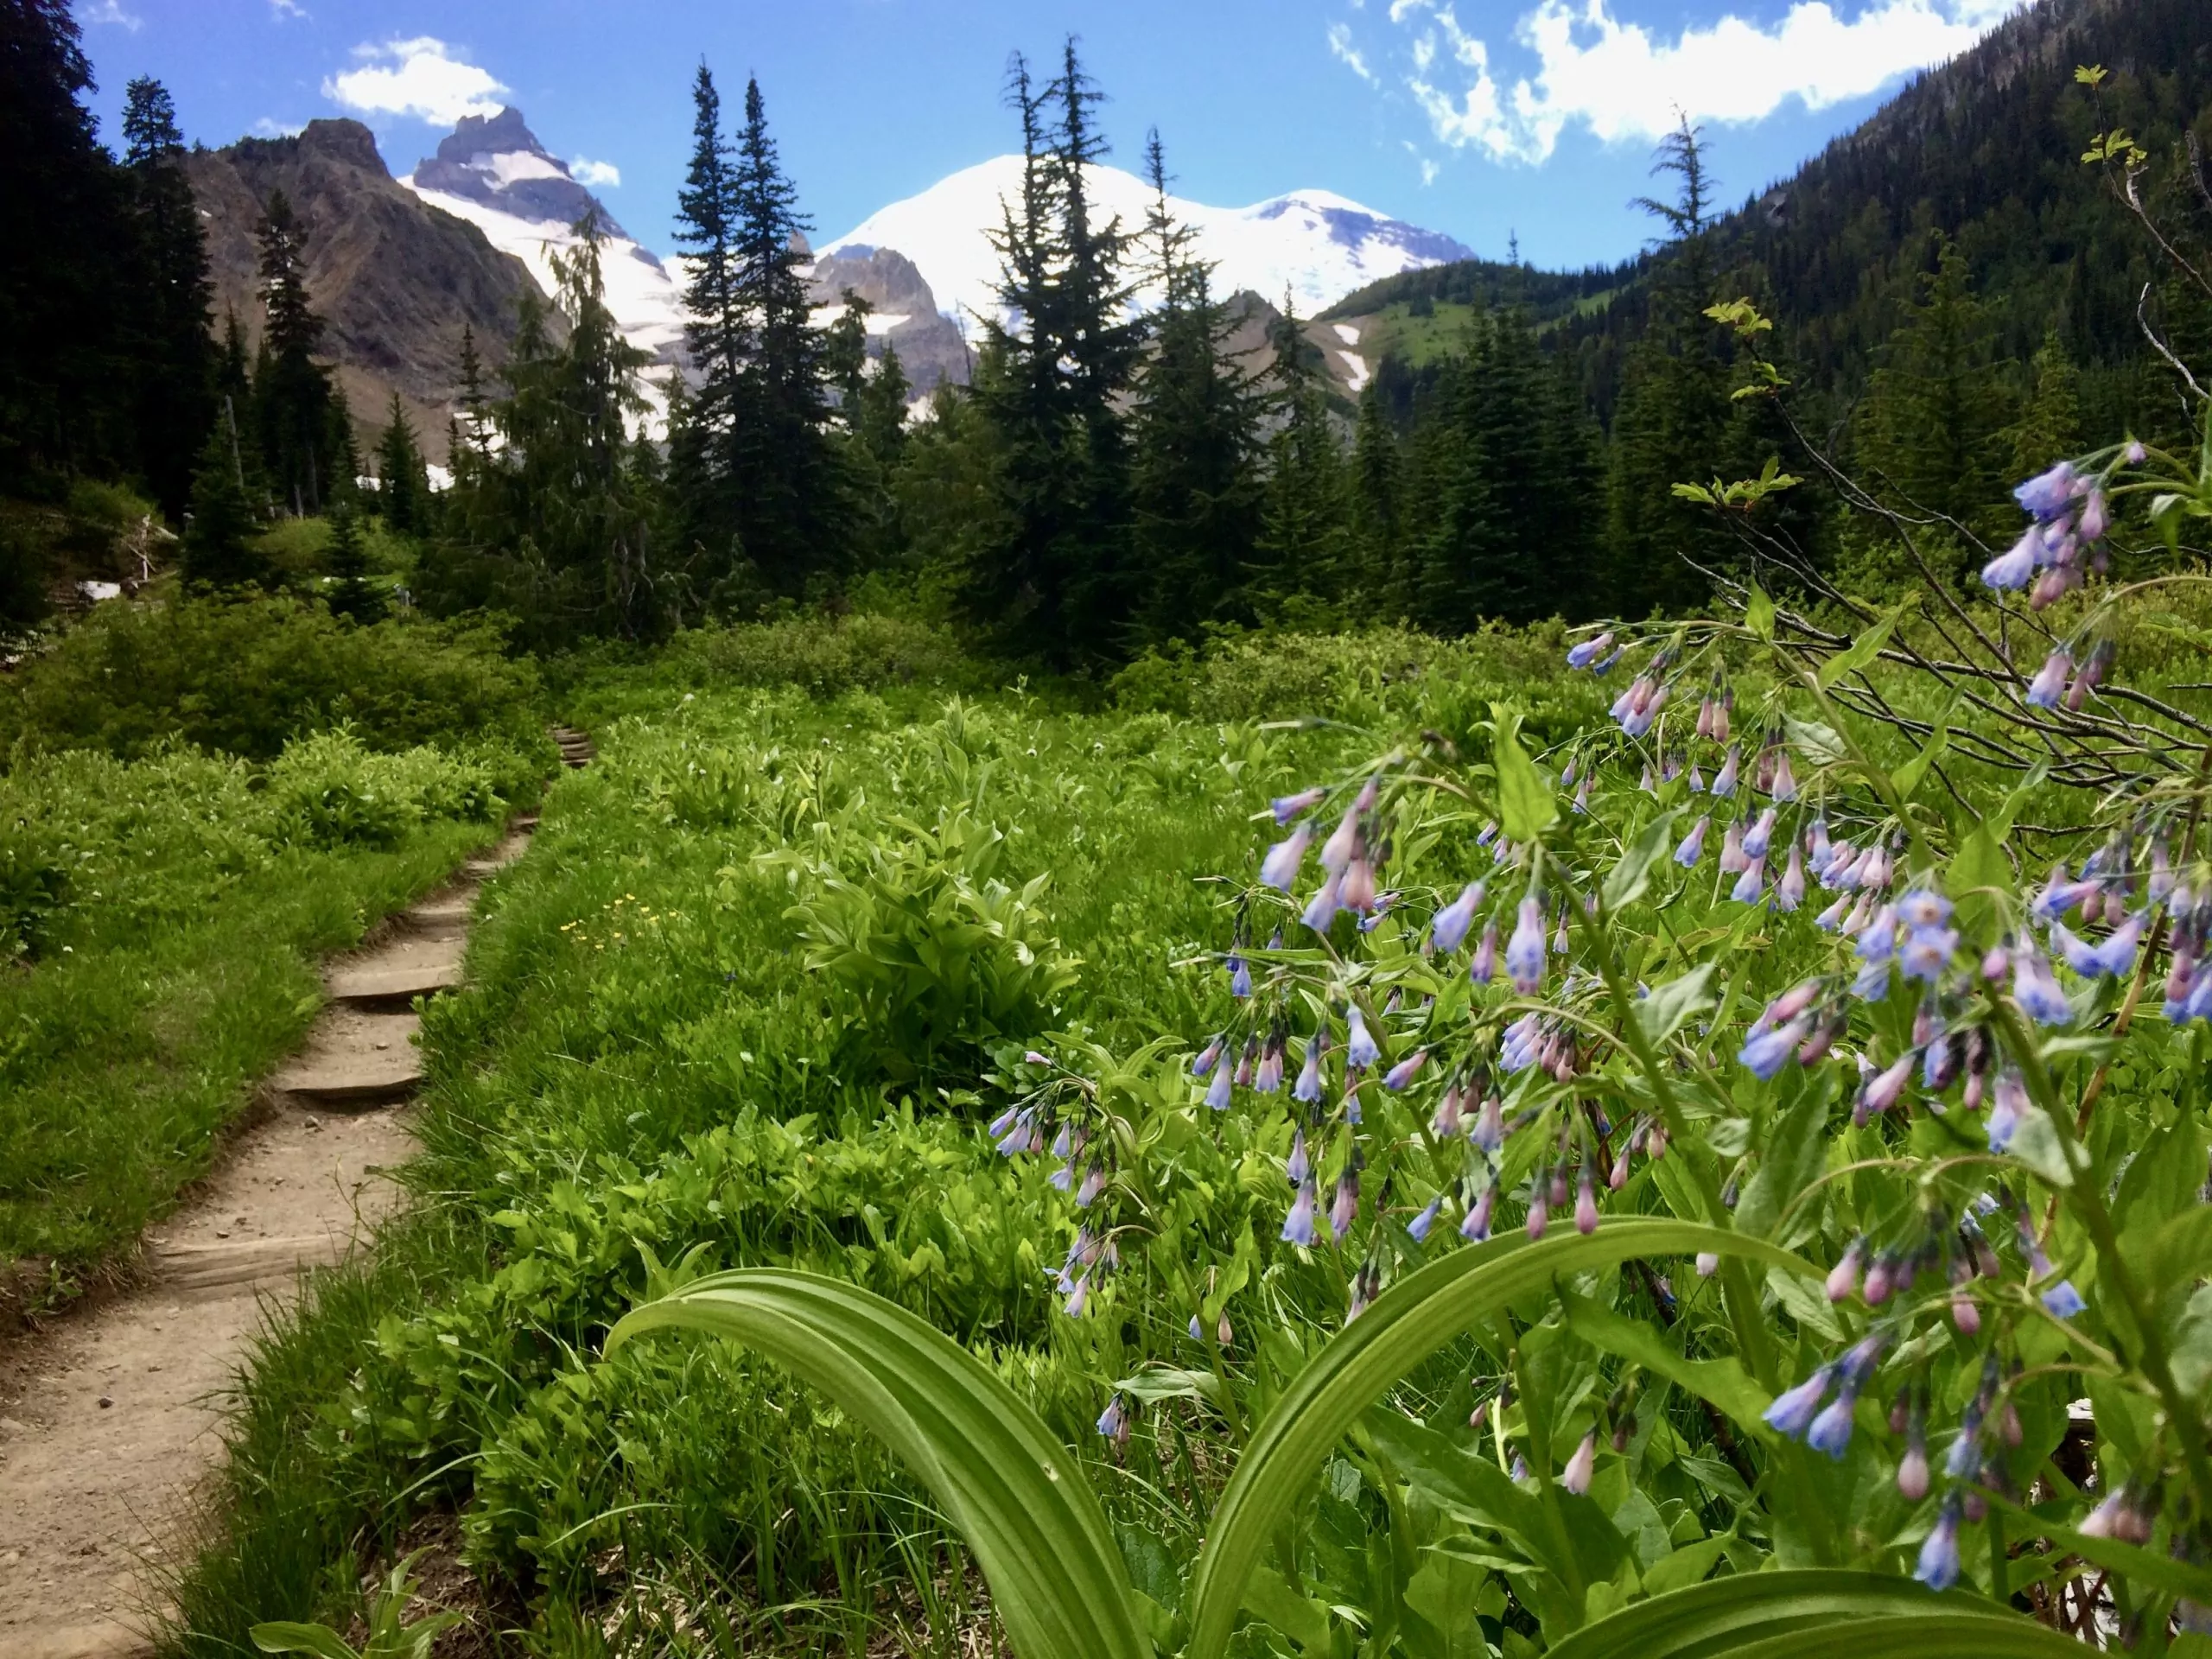
This moderate hike includes just about everything Mount Rainier has to offer. Beautiful lush forests, verdant alpine meadows, vivid wildflowers, and – of course – stunning views of Mount Rainer itself. Additionally, if you keep a sharp lookout, you’re very likely to spot a few marmots munching their way through the meadows.
The hike can easily be modified to fill a full day if you choose to continue onward towards Panhandle Gap – potentially turning the hike into a 12-mile round trip. However, the stunning scenery and beautiful meadows that you’ll encounter on your way to the Summerland Campground – my recommended turning point – are equally jaw-dropping.
Trail Details
Trailhead: Summerland Trailhead on Sunrise Park Road
Hike Type: Out and Back
Mileage: 8.4 Miles Roundtrip – Hiking Out to Summerland Camp
Elevation Change: +2,000 Feet
Trail Condition: Dirt Trail Through Alpine Meadow with Occasional Creek Crossing
Bathroom Facilities: None at Trailhead – Bathrooms Near White River Park Entrance
Starting Point: Summerland Trailhead
This trail begins on the same road you would take to reach Sunrise for the abovementioned Burroughs Mountain Hike – Sunrise Park Road. As before, you’ll reach the Mountain Rainier Park area on Highway 410 and turn on to Sunrise Park Road. You’ll first stop at the White River park entrance – where you’ll pay your entrance fee – before continuing for another three miles. At this point, you’ll cross Frying Pan Creek, and the trailhead is on the other side of the bridge.
The parking lot is relatively small, and only has space for approximately 25 cars. Therefore, I recommend getting an early start to the day in order to find an open parking spot.
The Trail
As the Summerland Trail is the only trail for this parking lot, the trailhead will be easy to spot. You’ll first start in the beautiful forest as you follow Frying Pan Creek towards the south. While views of the surrounding mountains will be partially obscured during this portion of the hike, don’t worry. The views will undoubtedly open up later on. Instead, enjoy the pleasant and refreshing hike as you’re protected from the sun, admire the beautiful forest, and snap a few stunning pictures of the creek when you occasionally cross paths.
After about three miles, you’ll cross over Frying Pan Creek and emerge into beautiful alpine meadows as Mount Rainier materializes directly in front of you. The views here are absolutely stunning, especially earlier in the summer, when a plethora of colorful wildflowers add their splashes of color to the landscape. Take your time on this section and enjoy everything the lush scenery has to offer.
Presently, after a few moderate switchbacks, you’ll emerge at the Summerland Campground. There are plenty of spots to sit down and enjoy lunch and soak up the sun and views. However, be careful to stay within the cleared areas of the campground or on the trail – do not head off across the alpine meadows to find a lunch spot as this can seriously harm the meadow’s delicate plant life. If you need it, there should be a pit toilet available at the Summerland Campground.
Extension Towards Panhandle Gap
While the Summerland Campground is my recommended turnaround point for the day, you can absolutely continue onward if you have the time and energy. The trail will continue to climb, providing incredible views of both Mount Rainier and its glaciers. After an additional 1.4 miles from the Summerland Campground, you will emerge at Panhandle Gap. Here, you’ll continue to have sweeping views of the mountains and alpine meadows. Panhandle Gap can still be snow-covered well into July, so prepare accordingly.
Permits and Fees
The Summerland trailhead is just a few miles past the Rainier White River entrance, and consequently, you’ll need to pay the park entrance fee upon arriving. Keep in mind, however, that the America the Beautiful National Park Pass will grant you access to any of the country’s national parks – including Rainier – and can quickly pay for itself with just a few visits. I therefore highly recommend this park pass to any adventurer or traveler who can picture themselves visiting a few more national parks over the course of the year.
When to Hike
Early July through mid-October is the best time to hike this particular trail. The best wildflower blooms often occur earlier in the season, but the mountain views and beautiful alpine meadows are picturesque through the summer hiking season. Keep in mind that you’ll be in direct sunlight after leaving the protective forest as you approach Summerland Campground, so sunscreen and a hat are highly recommended. As always, you should check the weather and trail conditions before starting out for your hike.
Wildland Trekking Hiking Adventures
As the world’s premier hiking and trekking company, Wildland believes in connecting people to fantastic environments in amazing ways. Wildland Trekking Company offers an array of incredible hiking and trekking experiences in the United States and around the world. From backpacking adventures, to llama hiking, to shorter day hikes, you’re sure to find the ideal trekking vacation for you.
To learn more about our guided backpacking trips and all of our award-winning hiking vacations, please visit our website or connect with one of our Adventure Consultants: 800-715-HIKE.

